Custom Action Testing
Testing your custom FlowRunner actions is a crucial step in the development process. It ensures that your action behaves as expected and helps identify potential issues before it is used in a live environment. Whether your action interacts with external services, processes data, or works within an OAuth2 workflow, proper testing allows you to validate functionality, handle errors gracefully, and ensure smooth integration with other services.
If your action interacts with an external service provider requiring OAuth2 authorization, you will need to create an OAuth connection by executing the OAuth workflow. You can initiate this workflow from either the API Services screen in the Backendless Console or directly from the Flow Editor interface.
Actions with OAuth2 Authorization
Before testing, make sure that your service is deployed. Once deployed, it will be listed on the API Services screen in the Backendless Console. Here’s how to start testing OAuth2-enabled actions:
- On the API Services screen, find your deployed service and expand it to show a list of available operations.
- Select the operation you marked as a FlowRunner action.
-
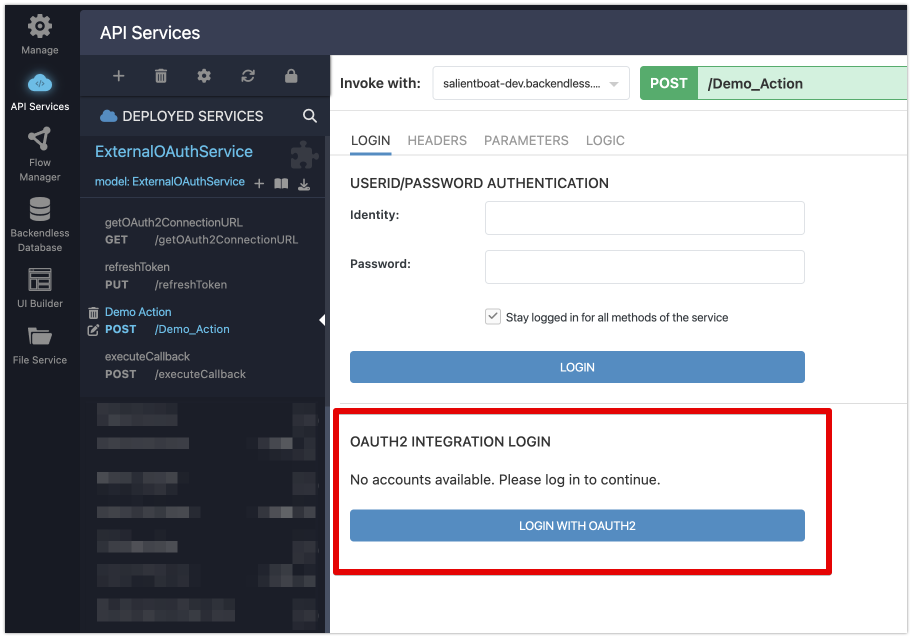
Under the LOGIN tab, locate the OAUTH2 INTEGRATION LOGIN section and click the LOGIN WITH OAUTH2 button. This triggers the OAuth2 workflow, allowing you to authorize your account with the external service provider.
 4. Once authorization is successful, the connected account will appear in a drop-down list of available OAuth2 connections.
Running Test Invocations
Before running a test, make sure you've provided the necessary data for your action. If your action requires OAuth2 authorization, ensure the OAuth2 connection is established first. Here’s how to run a test:
- Select the PARAMETERS tab. You will see a dynamically generated form displaying the parameters required by the selected action or operation.
- Enter the appropriate test data into the parameter fields.
- Click the INVOKE button in the upper-right corner to trigger the operation. The system will execute the action with the test data, and the result will be displayed on the screen.
Testing from the API Services screen is recommended because it offers a straightforward way to validate your action. However, if you prefer testing within a visual flow, you can also perform testing directly in the Flow Editor.
Testing from the Flow Editor
The Flow Editor interface allows you to test your actions within the context of a flow. You can test your action’s behavior in real-time and ensure its integration within a larger flow.
For more detailed information on testing within flows, refer to the Testing your Flows section of this guide.
Note
If your action requires OAuth2 authorization, you’ll see the LOGIN button in the properties sheet for your action in the Flow Editor. Refer to Step 5 in the Step-by-Step Explanation of the OAuth2 Authorization workflow for detailed steps on the login process.
Conclusion
Testing ensures that your FlowRunner actions work as intended and helps catch potential issues early in the development process. By testing actions through the API Services screen or the Flow Editor, you can simulate real-world scenarios and validate that OAuth2 workflows, external service integrations, and other complex functionality operate seamlessly.
Always ensure that the OAuth2 connection is properly established before testing any action that relies on external service providers. This ensures that your service will perform correctly when it is put into production.