Customer Satisfaction Survey
The Customer Satisfaction Survey Flow is an interactive demonstration of how FlowRunner™ processes external data submissions, validates input, and dynamically routes logic to automate communications. By working through this flow, you’ll learn how to integrate external systems (such as Google Forms) with FlowRunner™ and explore core concepts like validation, database interactions, and conditional logic.
User Experience
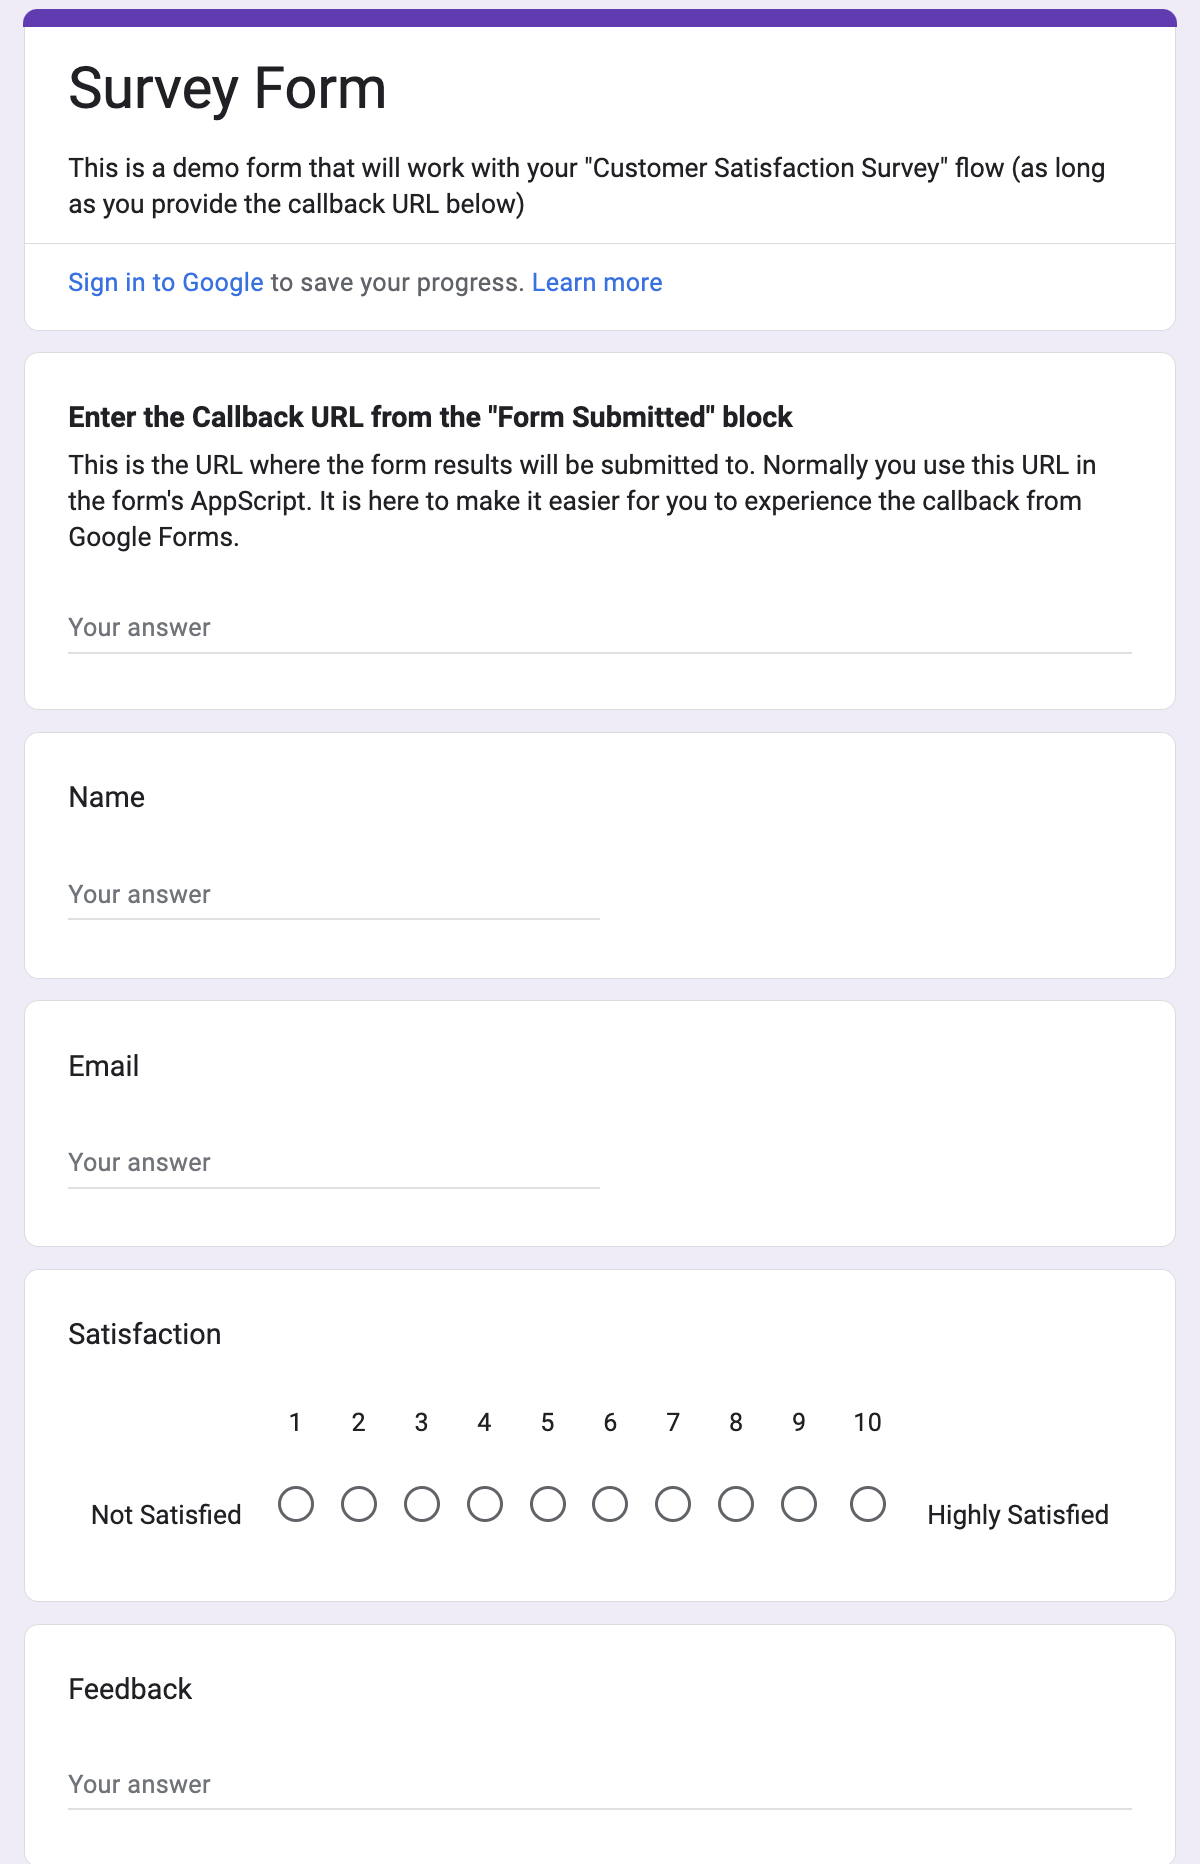
This flow begins with a user filling out a Google Form, which collects the following details: Name, Email, Satisfaction Rating, and Feedback. Upon form submission, the flow validates the input, saves it to a database, and sends a tailored email based on the satisfaction rating provided by the user.
Flow Implementation
Receiving and Validating Data
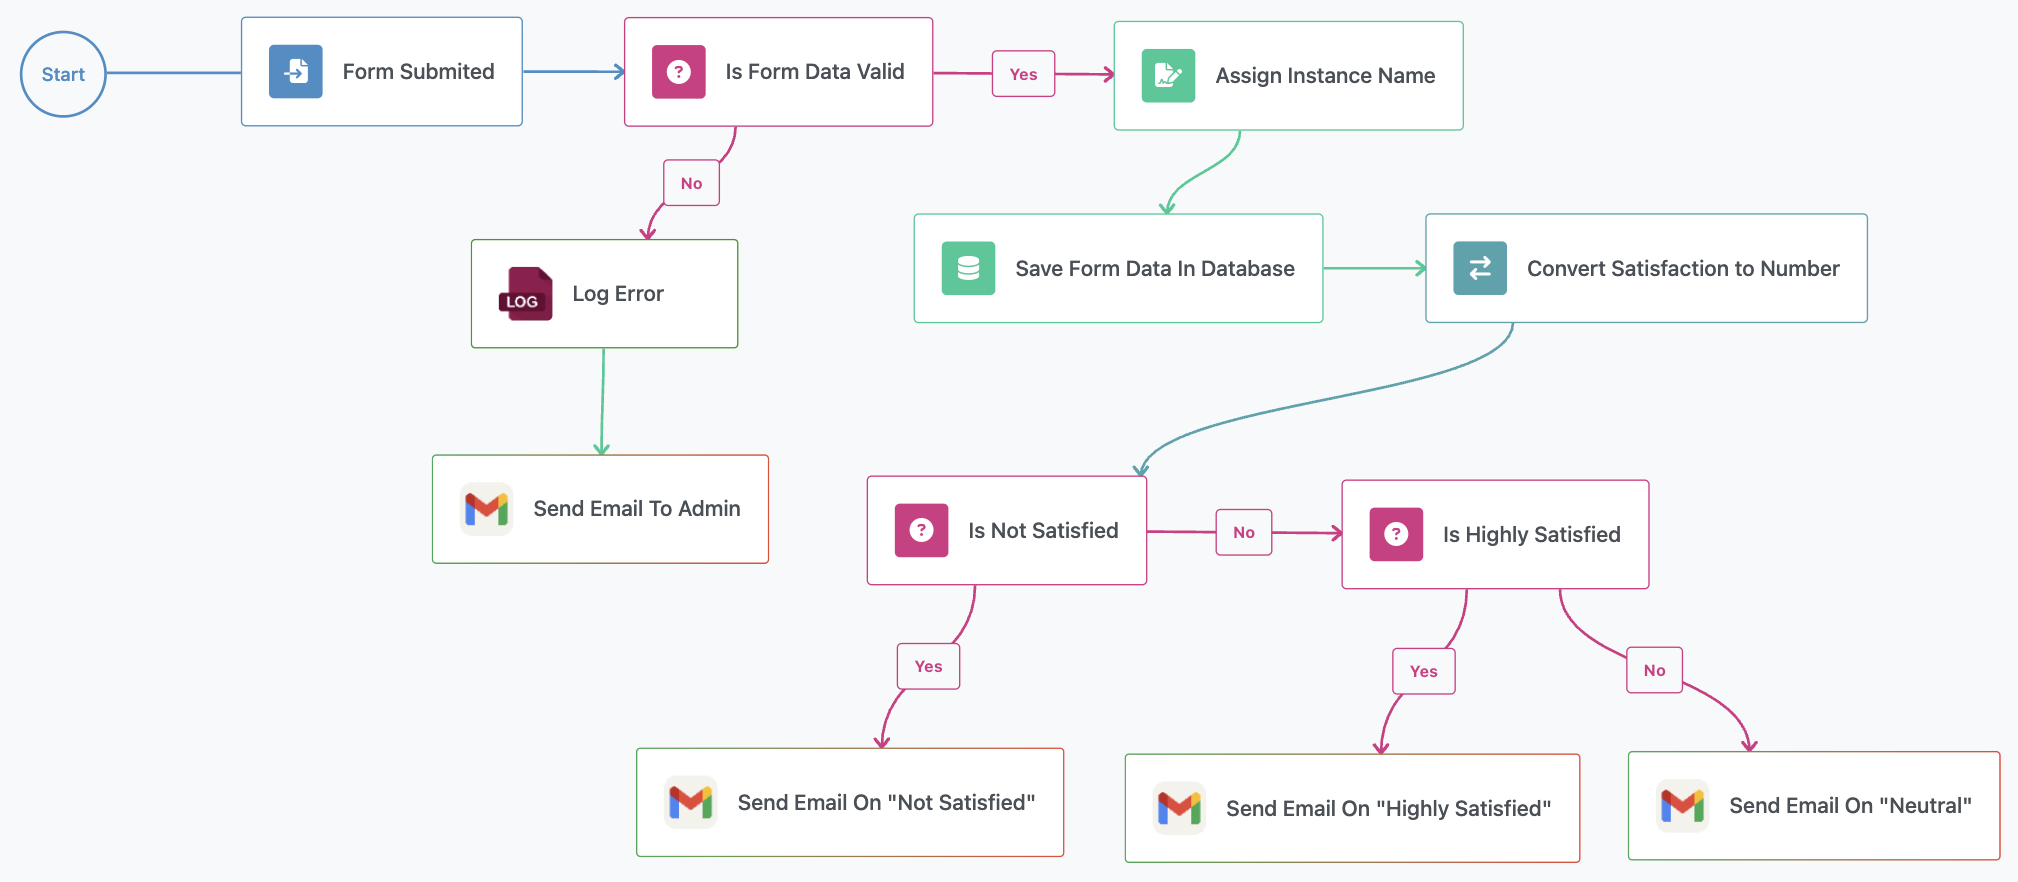
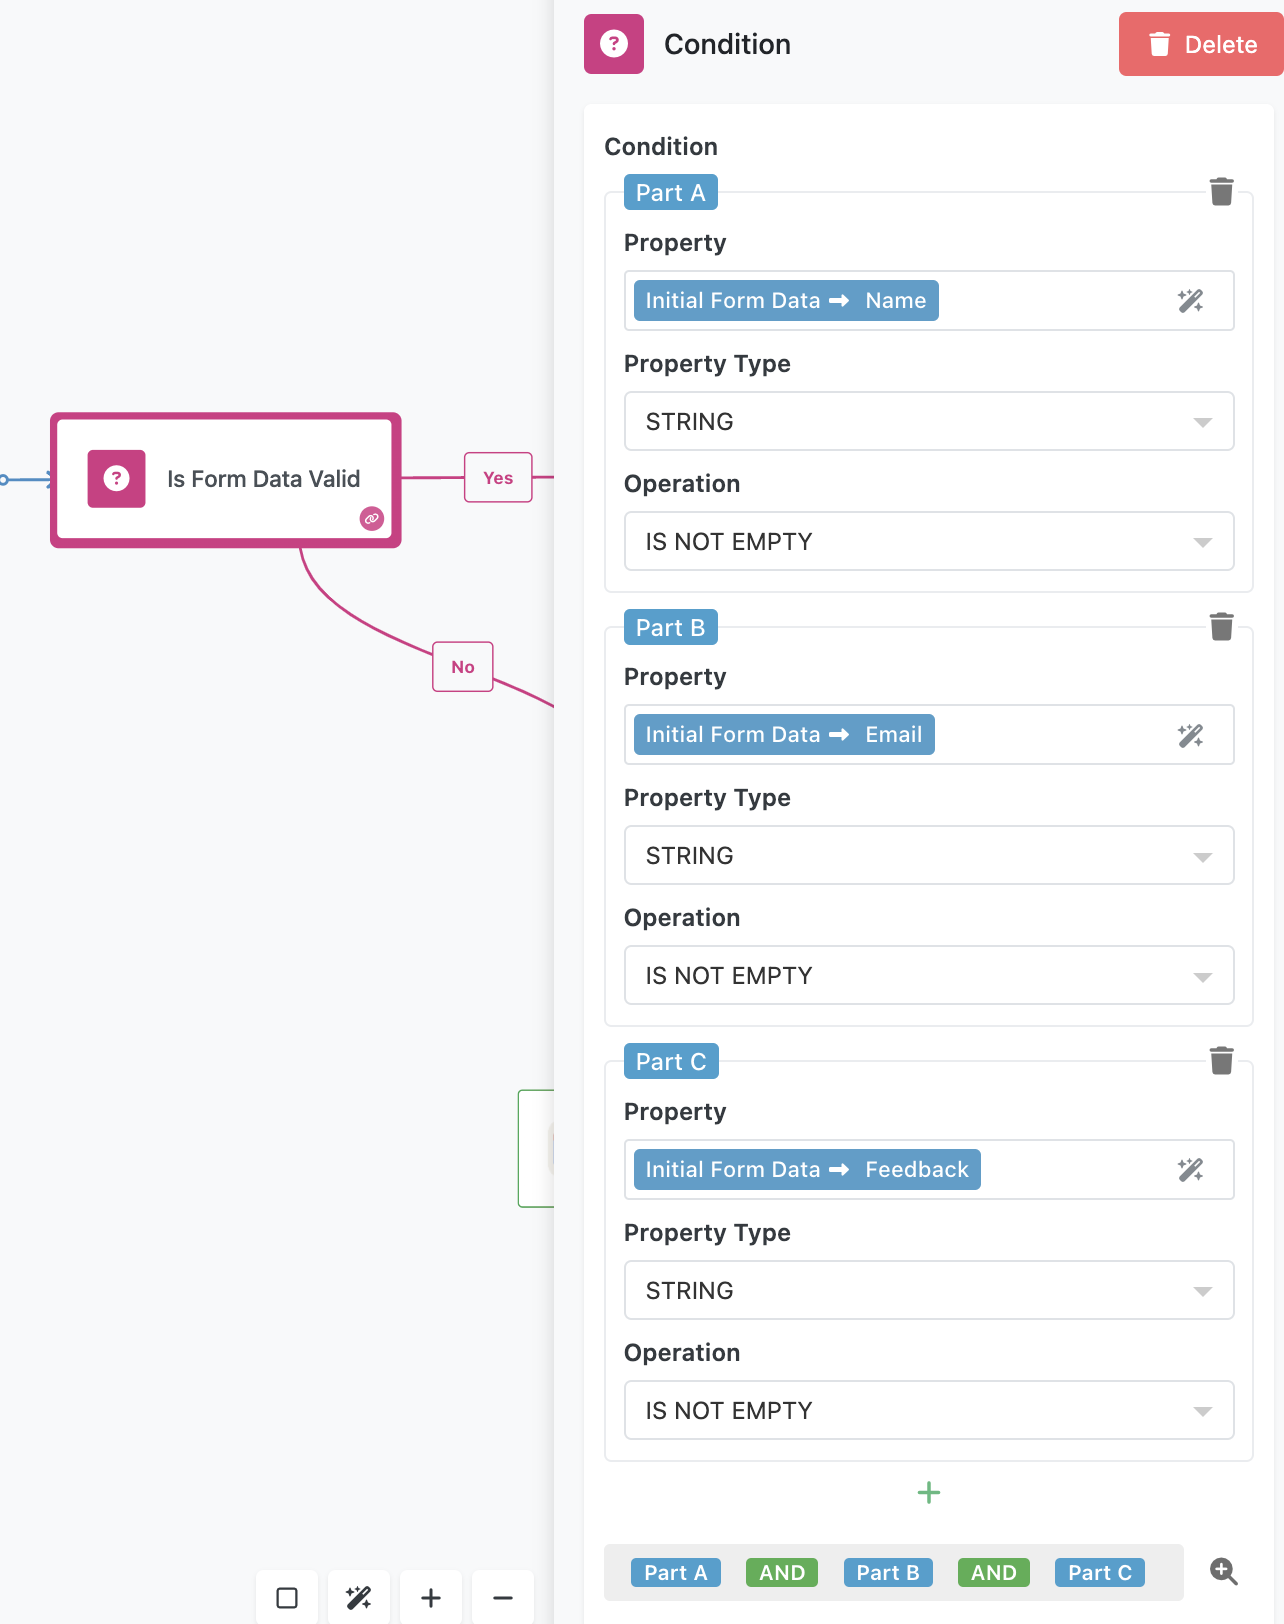
The Form Submitted block receives the data submitted from the Google Form. The flow then validates the data using the Is Form Data Valid condition block, ensuring that the required fields (Name, Email, and Feedback) are present and not empty. Below is the configuration panel for the condition block. Notice how the entire condition consists of three parts - A, B, and C.
The entire logical expression of the condition is shown at the bottom of the screen in the screenshot above. The AND operators are clickable to change between AND and OR. The individual parts can be dragged to place elsewhere in the condition expression. Finally, you can place round brackets around parts of the expression to prioritize its evaluation.
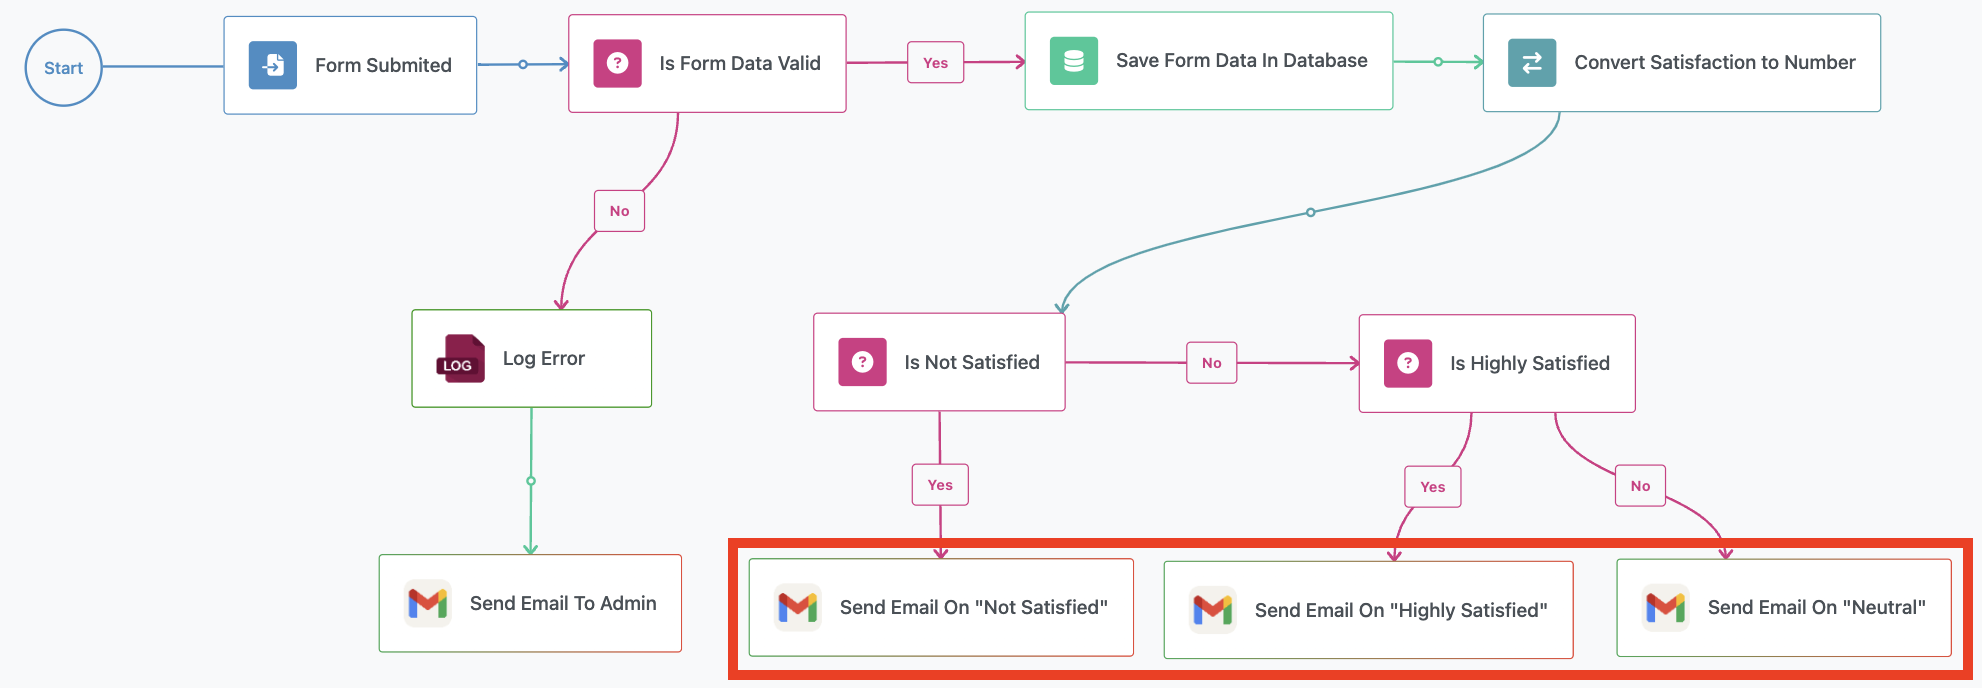
If the condition evaluates to false, the flow proceeds down the No branch. In that case, the flow logs an error message to FlowLogger and notifies the admin via email. Otherwise, the flow continues through the Yes branch.
Assigning Instance Name
Each form submission initiates a new instance of the flow, and every instance maintains its own unique context to manage the data it operates on. This design is a core architectural feature of FlowRunner™, ensuring proper sandboxing to keep data isolated between different automation "runs."
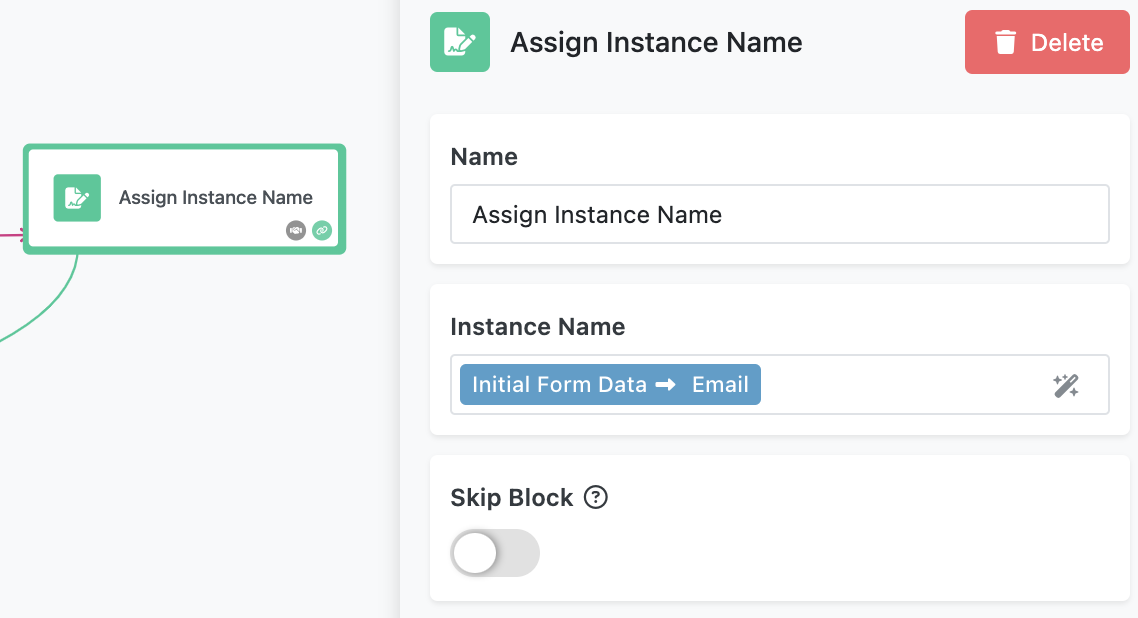
To make it easier to identify individual flow instances in the analytics interface, you can assign a descriptive name to each instance. This name can be dynamically generated using any data the flow processes. For example, in this sample flow, the instance name is assigned as the user's email address. Choosing meaningful names enhances traceability and helps you quickly understand the purpose or origin of each instance.
Saving Data to the Database
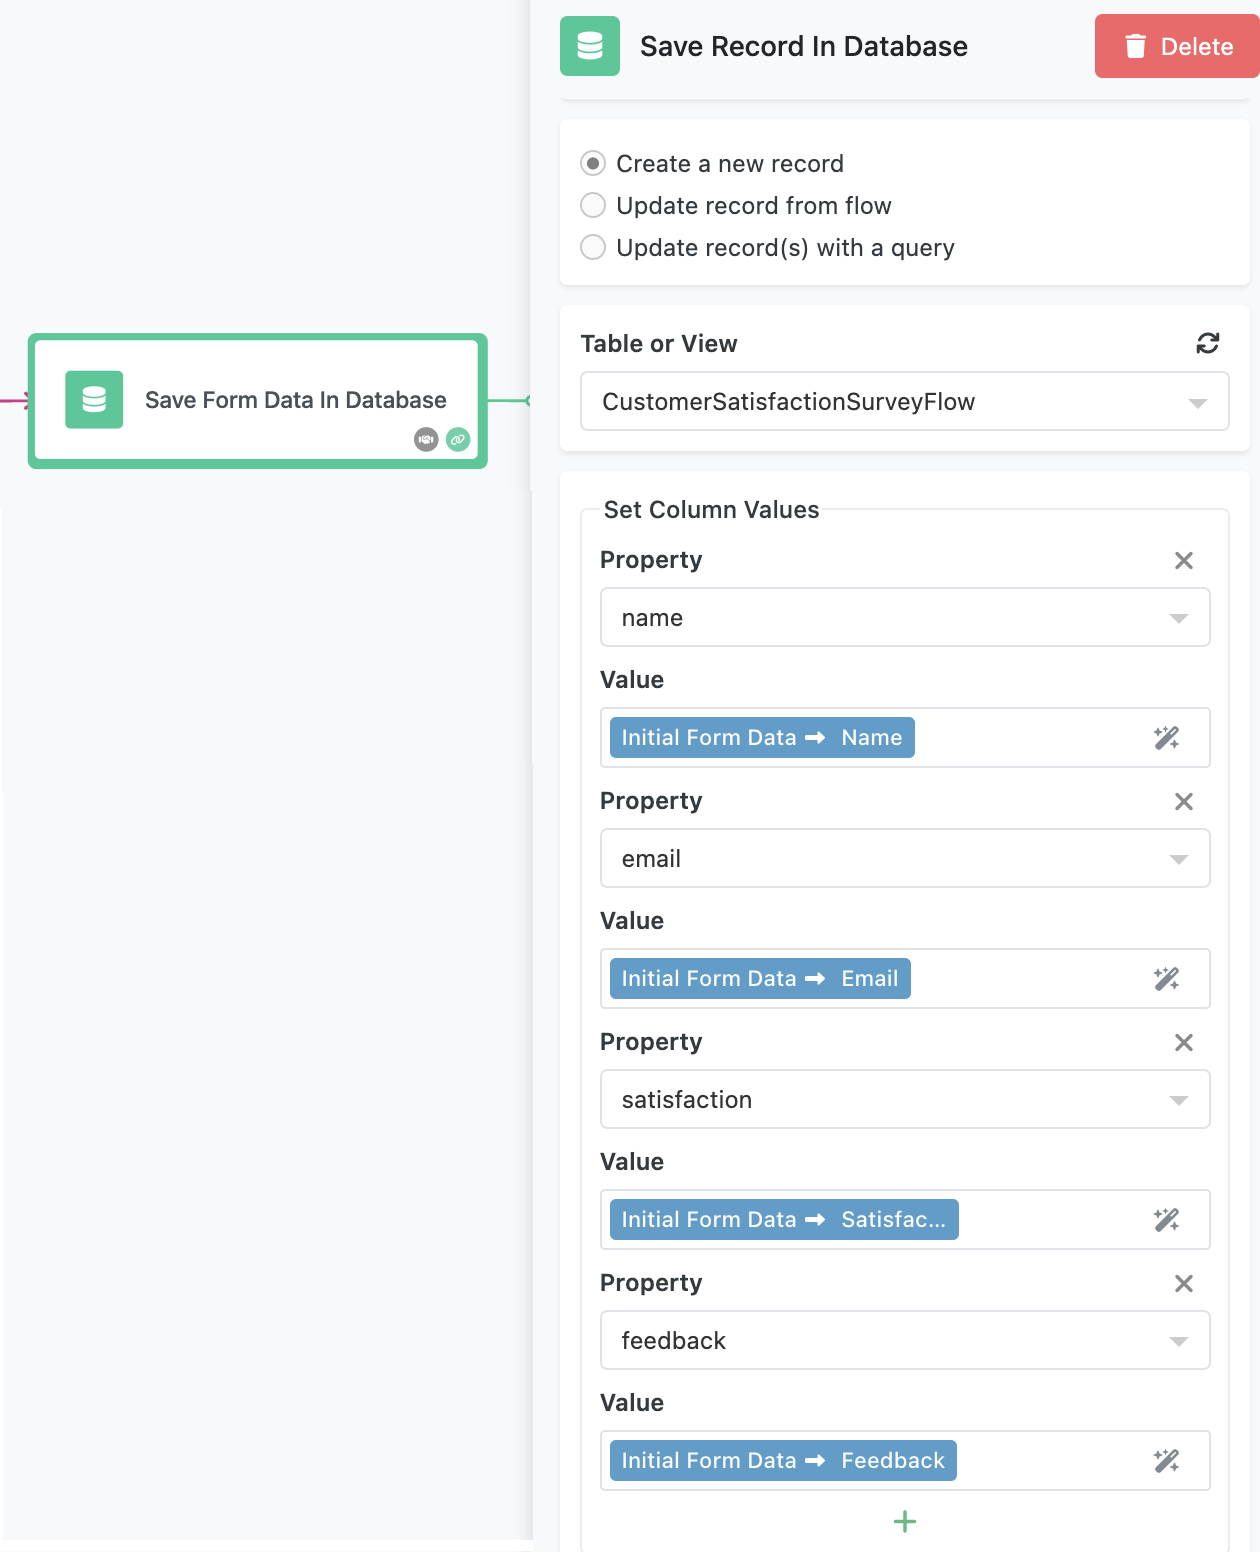
The flow uses the Save Record in Database block, labeled as Save Form Data in Database, to persist the data in the table. Each field from the form is mapped to a corresponding column in the database. The Property drop-downs are populated dynamically with the names of the columns from the selected table.
Note
To inspect the database, its structure/schema and the data it stores, click the QUICK ACCESS button in the top-left corner and navigate to Backendless Database. You will find the CustomerSatisfactionSurveyFlow table. Click the table to select it. The DATA BROWSER tab will display the table data. To see the table structure/schema, click the SCHEMA tab.
Sending Follow-Up Emails
The primary goal of this flow is to send a personalized follow-up email based on the user’s satisfaction rating. Each email serves a specific purpose:
- Highly Satisfied (9 or above): Thank the user for their feedback and encourage them to share a testimonial.
- Neutral (6 to 8): Request suggestions for improvement to better meet user needs.
- Not Satisfied (5 or below): Apologize and invite the user to provide additional feedback.
Evaluating Satisfaction Rating
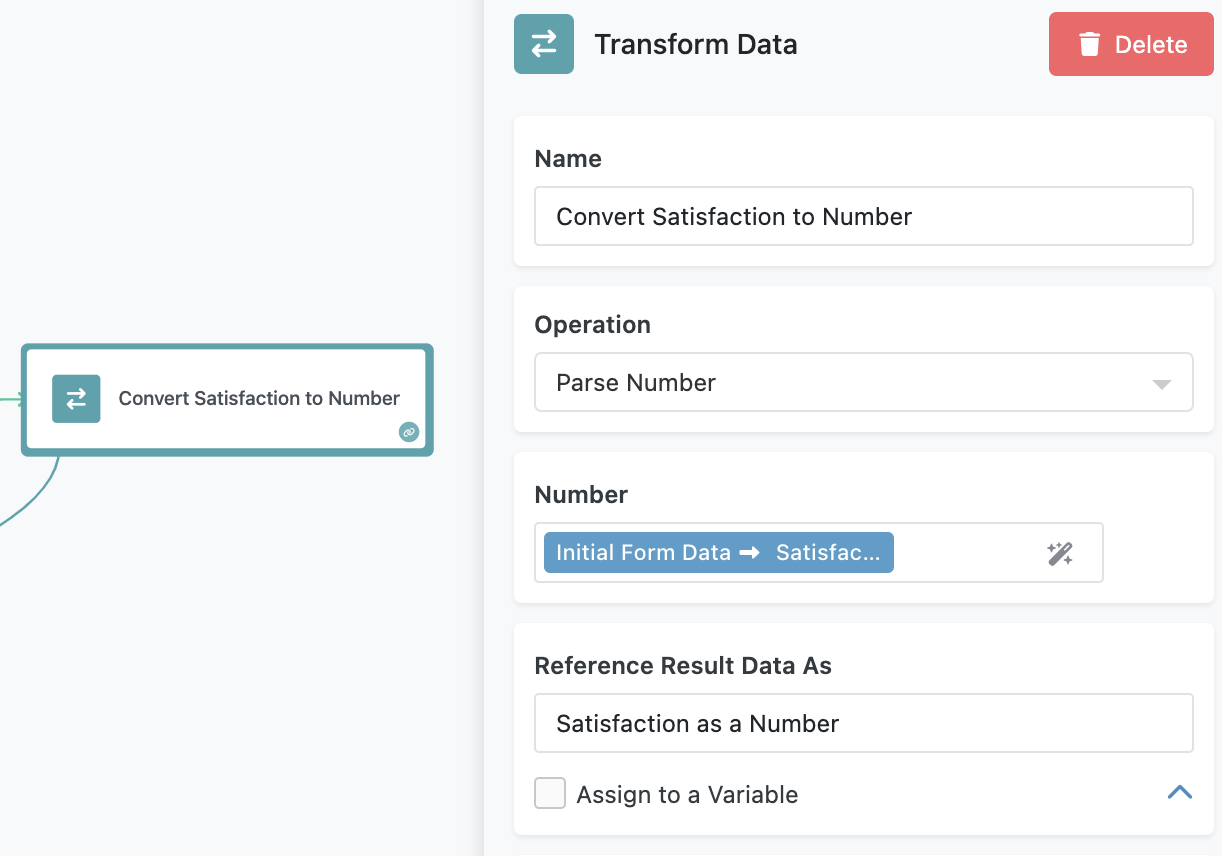
To determine which email to send, the flow evaluates the satisfaction rating submitted through the Google Form. However, since Google Forms submits the rating as a string, the flow cannot directly compare it to numeric thresholds.
To address this, the flow uses a Transform Data block to convert the satisfaction rating from a string to a numeric value. The transformed value, referred to as Satisfaction as a Number, ensures that subsequent condition blocks can properly evaluate the rating.
Using Conditional Logic
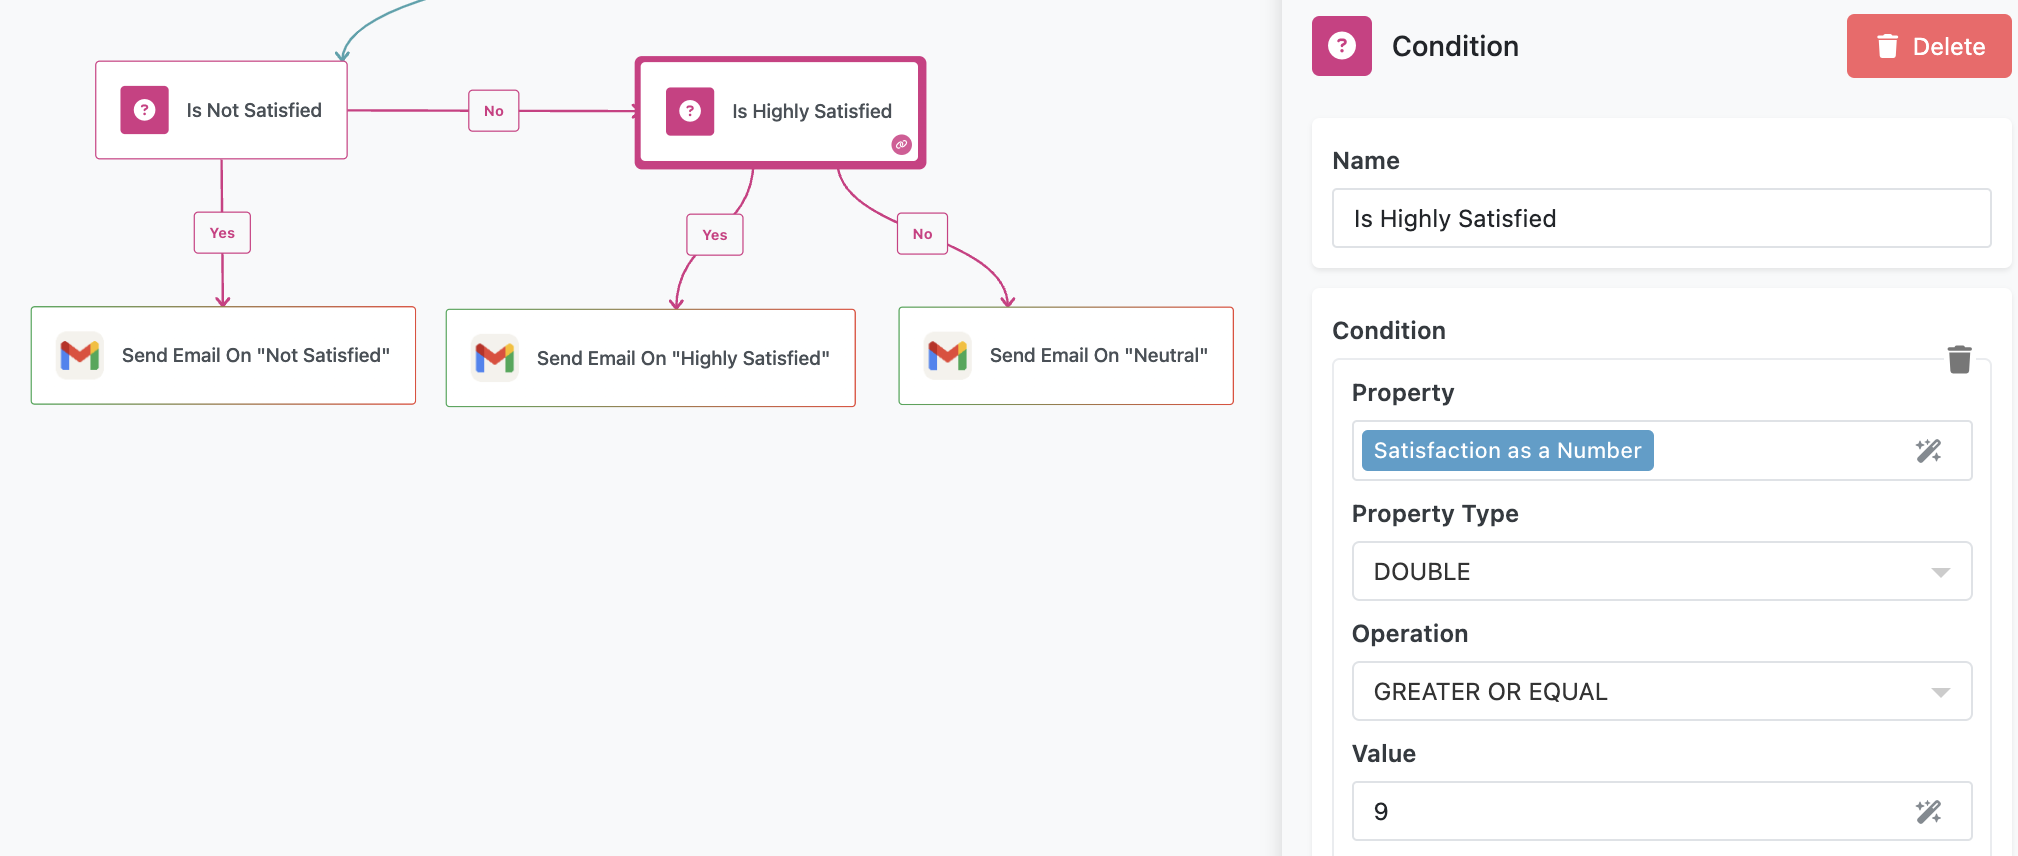
With the numeric satisfaction value ready, the flow uses two condition blocks to route the logic:
-
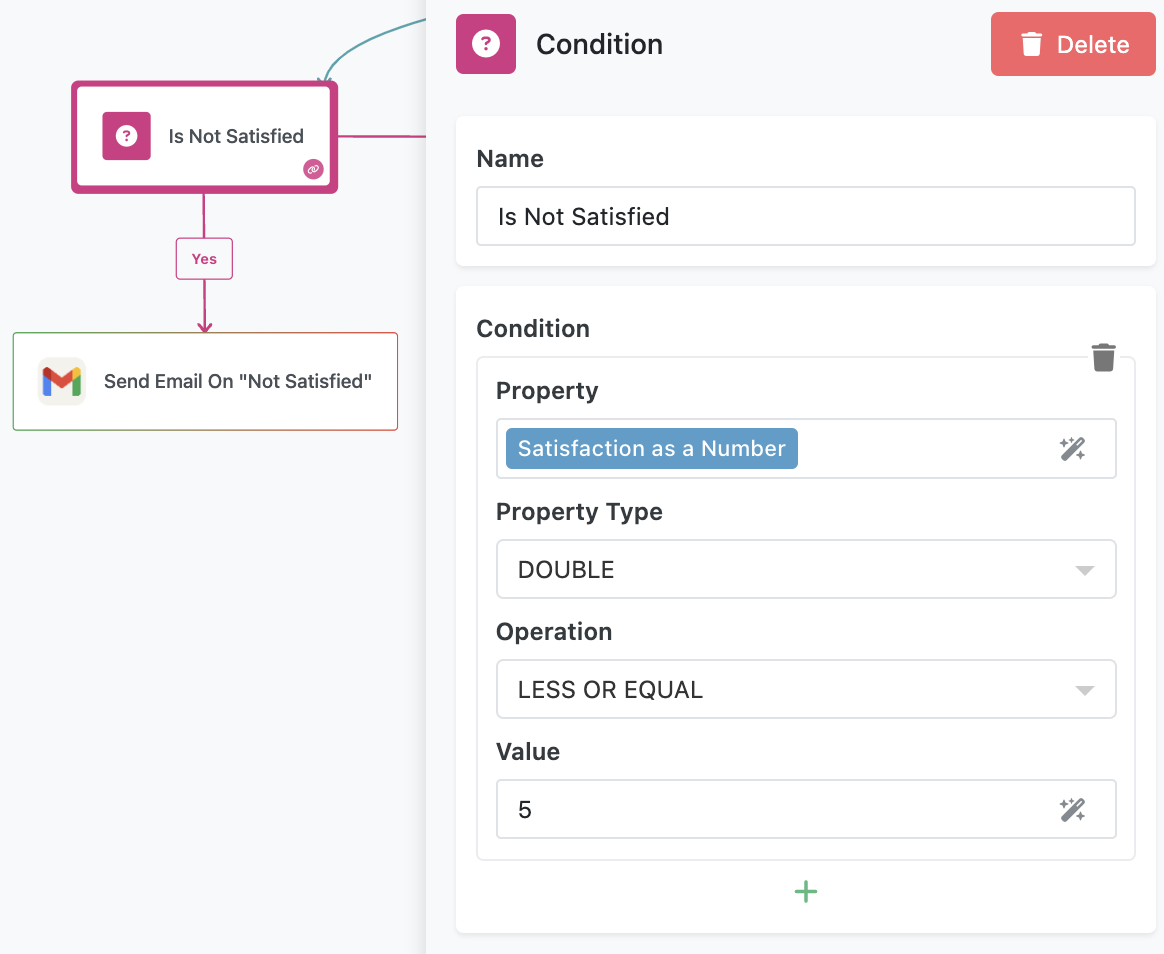
The first condition checks if the satisfaction rating is 5 or below. If true, the flow sends the "Not Satisfied" email.
-
If the first condition is false, the flow proceeds to the second condition, which checks if the rating is 9 or above. If true, the flow sends the "Highly Satisfied" email.
-
If neither condition is true, the flow defaults to sending the "Neutral" email.
By structuring the flow in this way, every user receives a follow-up message that reflects their feedback, enhancing the user experience and maintaining effective communication.
Preparing to Run the Flow
-
Set Up FlowLogger - Open FlowLogger and copy the session code. Click the Log Error block and click the Configure button to enter the session code.
-
Authenticate Gmail Integration - Click the Send Email to Admin block. Click Login to authenticate with your Google account, allowing the flow to send emails. Select the created OAuth connection for all other email follow-up blocks (click the block and select the connection in the OAuth Connection section).
-
Set Up the Google Form - To start working with this flow, we’ve prepared a Google Form for testing purposes. This shared form requires you to supply your flow’s callback URL, as the URL is unique for each user. Follow these steps to link the form to your flow:
-
Get Your Flow’s Callback URL
Open the Form Submitted block in the Flow Editor, which is an External Callback. Copy the Callback URL from its properties. -
Paste the URL in the Google Form
Use the provided Google Form and paste your Callback URL in the first field. This ensures the form sends data to your flow.
Alternatively, you can recreate the form specifically for your flow by following the steps below.
-
Running the Flow
Submit the Google Form or your custom form. Monitor the flow’s execution in FlowLogger to observe data validation, database operations, and email delivery.
Set Up Your Own Google Form
-
Create the Form
Navigate to Google Forms and create a new form. Add the following fields:- Name (Short Answer)
- Email (Short Answer)
- Satisfaction (Linear Scale, 1 to 10, labeled "Dissatisfied" to "Highly Satisfied")
- Feedback (Paragraph)
-
Access the Script Editor
In the form, click the three-dot menu in the top-right corner, then select Script Editor. -
Add a Script to Submit Data to FlowRunner™
Replace any default code in the Apps Script editor with the following script:function onFormSubmit(e) { var url = "YOUR_EXTERNAL_CALLBACK_URL_HERE"; // Replace with your target URL var formResponse = e.response; // Extract answers from the form response var itemResponses = formResponse.getItemResponses(); var data = {}; for (var i = 0; i < itemResponses.length; i++) { var itemResponse = itemResponses[i]; data[itemResponse.getItem().getTitle()] = itemResponse.getResponse(); } // Send data as POST request var options = { method: "post", contentType: "application/json", payload: JSON.stringify(data) }; UrlFetchApp.fetch(url, options); }Replace
YOUR_EXTERNAL_CALLBACK_URL_HEREwith the Callback URL copied from the Form Submitted block. -
Set Up the Trigger
In the Script Editor:- Open the Triggers menu (clock icon or via Extensions > Apps Script > Triggers).
- Add a new trigger for the
onFormSubmitfunction. - Set the event type to On form submit and save.
-
Grant Permissions
When saving the trigger, Google will prompt you to authorize the script. Review the permissions, select your Google account, and allow the required access.Once completed, your custom form is ready to submit data to the flow.
This flow serves as a practical, hands-on example of integrating external tools, managing data, and automating responses with FlowRunner™. By following the steps above, you’ll gain a deep understanding of how to build reliable, efficient workflows.
