Prompt to Flow
If you use an AI tool such as Claude, ChatGPT, Codex or Cursor, Prompt to Flow lets you build a flow from a prompt: a description of the flow in plain words. You connect the tool to the FlowRunner™ MCP server once and sign in with your FlowRunner account. After that, when you describe a flow in a prompt, the AI builds it in your workspace from the same blocks, with the same checks, as the flow editor, and makes it live when you ask. Your program then calls it like any other flow.
MCP (Model Context Protocol) is the standard AI tools use to connect to other apps. The FlowRunner MCP server has one address for every tool:
Connect your AI tool
On a Team or Enterprise plan, use the Team and Enterprise steps after this list instead.
- In Claude, open Settings > Connectors. Customize in the left menu opens the same screen.
- Click + Add, then Add custom connector.
- Enter a name, such as
FlowRunner, and the server URLhttps://app.flowrunner.ai/mcp. - If the dialog offers sign-in choices, pick Sign in now under Authentication and Register automatically under OAuth client, and leave the OAuth client ID and secret empty. FlowRunner registers each AI tool automatically.
- Click Add. Claude opens the FlowRunner connector page, which says "You're not connected to FlowRunner yet."
- Click Connect and approve the FlowRunner sign-in page that opens (see Approve the sign-in).
- In a chat, click + > Connectors and check that FlowRunner is on.
On the Free plan you can add one custom connector.
On a Team or Enterprise plan, an Owner adds FlowRunner for everyone under Organization settings > Connectors > Add > Custom (if Claude asks for the type, choose Web), with the same URL. Each member then opens Settings > Connectors, finds FlowRunner (labeled Custom) and clicks Connect.
Claude asks before each FlowRunner action. Always allow stops the question for that action.
-
Add the server. In a terminal, in your project folder, run the following command:
This makes FlowRunner available to you in this project. To use it in every project, add
--scope userto the command. -
Sign in. Run the following command:
Claude Code opens the FlowRunner sign-in page in your browser (see Approve the sign-in). On a computer without a browser, add
--no-browser: Claude Code prints the link. Open it in a browser on any device, approve the sign-in, then paste the address the browser ends on back into Claude Code.Inside a Claude Code session you can sign in the same way: when Claude Code shows "1 MCP server needs authentication · run /mcp", type
/mcp, pickflowrunner, then Authenticate. -
Check the connection. Run the following command:
It prints:
In its default permission mode, Claude Code asks before each FlowRunner action, with the choices Yes, Yes, and don't ask again for that action, and No.
ChatGPT connects to MCP servers on the web (chatgpt.com) only.
- Open ChatGPT Plugins.
- Click Add, then Add custom MCP server.
- Enter a name, such as
FlowRunner. Under Connection, enter the Server URLhttps://app.flowrunner.ai/mcp. - Choose OAuth for authentication.
- Read the warning, select I understand and want to continue, then Create as a plugin.
- Install the plugin and approve the FlowRunner sign-in page (see Approve the sign-in).
- In a chat, type
@and pick FlowRunner.
ChatGPT asks you to confirm each action that changes something. Whether you can add a custom MCP server depends on your ChatGPT plan and, in a Business, Enterprise or Edu workspace, on your admin's settings.
-
Add the following lines to
~/.codex/config.toml(create the file if it does not exist):[mcp_servers.flowrunner] url = "https://app.flowrunner.ai/mcp" [mcp_servers.flowrunner.oauth] callback_url = "http://localhost:5555/callback" callback_port = 5555Codex needs the
oauthlines to sign in to FlowRunner. Without them, Codex reportsRegistration failed ... Invalid parameter redirect_uris. Any free port works in place of 5555; use the same number on both lines. -
Sign in. Open a terminal and run the following command:
Codex opens the FlowRunner sign-in page in your browser (see Approve the sign-in). On a computer without a browser, add
--no-browser: Codex prints the link. Open it in a browser on any device, approve the sign-in, then paste the address the browser ends on back into Codex. When the sign-in finishes, Codex printsSuccessfully logged in to MCP server 'flowrunner'. -
Check the connection. Run the following command:
The
flowrunnerrow showsOAuthin the Auth column:
To have Codex ask before every FlowRunner action, add
default_tools_approval_mode = "prompt" under [mcp_servers.flowrunner].
-
Create
~/.cursor/mcp.jsonto use FlowRunner in every project, or.cursor/mcp.jsonin a project folder for that project only:If the file already exists, add the
flowrunnerentry inside itsmcpServers. -
Open Customize in the sidebar, then MCPs, and follow Cursor's sign-in prompt for
flowrunner(see Approve the sign-in).
Cursor asks for approval before it uses a FlowRunner tool.
Approve the sign-in
Every tool sends you to the same FlowRunner page in your browser, shown here for Claude. If the browser is not signed in to FlowRunner, you see the FlowRunner sign-in page first.
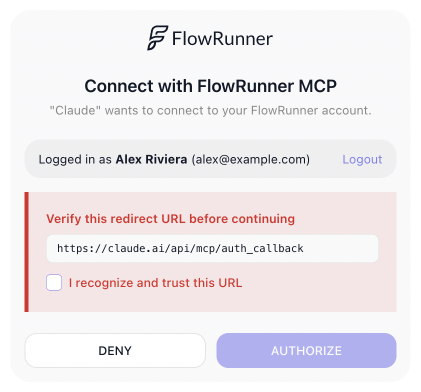
- Check the account under Logged in as. The AI works as this account, in every workspace the account belongs to: the page has no workspace choice. If it is the wrong account, click Logout, and start the connection again from your AI tool once you are signed in with the right one.
-
Check the address in the red box. It must belong to your AI tool:
- Claude:
https://claude.ai/api/mcp/auth_callback - ChatGPT: a
chatgpt.comaddress - a tool that runs on your computer, such as Claude Code, Codex or Cursor: a
localhostaddress, for examplehttp://localhost:60167/callback. For Codex, it is thecallback_urlyou set inconfig.toml.
If you don't recognize the address, click DENY. Your AI tool then reports that the sign-in was refused, and nothing is connected.
- Claude:
-
Tick I recognize and trust this URL. AUTHORIZE stays disabled until you do.
- Click AUTHORIZE. The browser hands the sign-in back to your AI tool, which reports that it is connected.
Build your first flow
Ask for a flow the way you would describe it to a colleague, including how your program will use it. A prompt like this one built the flow below:
Using the FlowRunner tools, build a flow called "Order Priority". My program will call it through the API and wait for the answer. The flow gets an order with a total and a customer email. If the total is more than 100, it returns the email with priority "high"; otherwise it returns the email with priority "normal". When it is built, make it live and tell me exactly what my program sends and what it gets back.
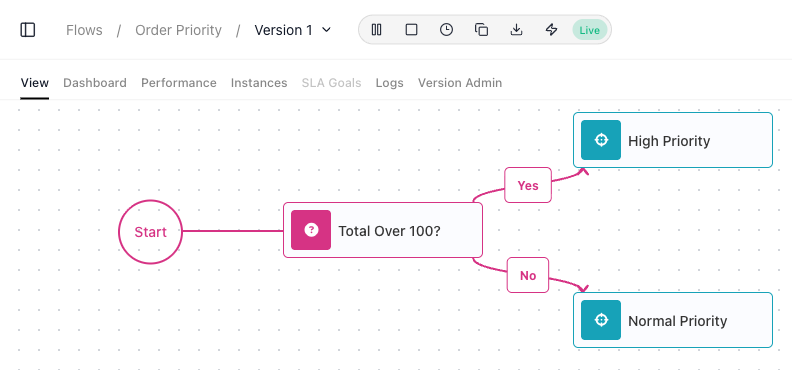
The AI created the flow, added three blocks and made the flow live. It is the
flow you would build by hand: a Condition block named Total
Over 100? checks the order's total. Its Yes exit ends at a
Return Result block named High Priority, and its No
exit at one named Normal Priority.
The AI's answer described what the program sends and gets back. The AI chooses these property names, so read them from its answer, or from the flow in the editor, before you write the caller. The program sends:
and gets back:
A total of 100 or less returns "normal". Your program calls the live flow through
Call Flow (Blocking), which waits for the returned value:
curl --request POST \
  --url "https://api.flowrunner.ai/{workspace-id}/{api-key}/automation/flow/Order%20Priority/activate-blocking?waitResponseTimeoutSeconds=30" \
  --header "Content-Type: application/json" \
  --data '{"total": 150, "email": "customer@example.com"}'
waitResponseTimeoutSeconds=30 lets the call wait up to 30 seconds for the answer.
The workspace ID and API key are in the Credentials section of Workspace Settings. To keep the key out of the URL, send it in a header instead (see Sending the key in a header).
The AI cannot start a run of the flow through its FlowRunner connection: the connection lets it build flows, make them live and run single blocks. You call the flow yourself, or ask an AI tool that can run commands on your computer to do it for you.
The flow is an ordinary flow. It is in the workspace's flow list, and you can open it in the flow editor or ask the AI to change it.
Design a prompt for your flow
The AI builds what your prompt describes. Whatever the prompt leaves out, the AI decides for you: what starts the flow, what the fields are called, what happens when a step fails. Some of those choices will not be the ones you need, and each one you fix costs another round with the AI. So when you design a prompt for a new flow, include as many details as you can. Write it the way you would brief a colleague who has to build the flow while you are away and cannot ask you questions.
Every prompt needs these four things:
- What the flow does. The data it gets, the decisions it makes, and what it returns, sends or writes at the end.
-
What starts each run. For example:
- your program calls the flow and waits for the answer;
- another system calls a webhook;
- a schedule runs the flow, such as every weekday at 9 am.
If you leave this out, the AI picks a start itself, and it may not suit your program. A flow started by a webhook, for example, answers the call with the new run's ID only, so your program gets no result to read.
-
Whether to make it live. Your program can call the flow only once it is live.
- What the AI tells you when it is done. For a flow your program calls, ask for exactly what the program sends and what it gets back. You need both to write the program.
The more of these details you add, the closer the first build comes to what you need:
- The data that comes in. The field names, and an example such as
{"total": 150, "email": "customer@example.com"}. Without them, the AI names the fields itself. - The rules, with their edge cases. Exact thresholds and which side the boundary falls on: "more than 100" or "100 or more". What to do when a value is missing or empty.
- The shape of the answer. The property names and values your program expects, so your code does not have to follow names the AI chose.
- The services the flow uses. Which app, which connection when you have more than one, and the details the step needs, such as the Slack channel or the spreadsheet to write to.
- What happens when a step fails. Retry it, skip it, or stop and report the error.
- Names. What to call the flow, so you can find it in the flow list.
If your account belongs to more than one workspace, also name the workspace to build in.
After the first build, read what the AI says it built, and open the flow in the flow editor to check it. If something is off, describe the change in a new prompt, and the AI changes the same flow.
What the AI can do in your account
The AI acts as the account you signed in with, in every workspace that account belongs to.
It can read:
- your workspaces, their flows, and the settings of every block;
- the workspace API key, which is part of the URL of every webhook block (External Callback). An AI tool that can run commands on your computer can use the key to start runs of any live flow through the API, without asking you;
- the settings an extension keeps for the workspace, including secret values, such as a webhook secret, that the extension's settings screen masks;
- your app connections, including the connected account's name and email, but no passwords or tokens;
- your saved AI keys, by name only.
It can also:
- create flows, and add, change or remove blocks in any flow;
- make a flow live, pause it, or stop it;
- set a flow's schedule;
- change the settings an extension keeps for the workspace, such as which QuickBooks environment it uses;
- run a single block on its own. The block really runs: an email is sent, a row is written.
It cannot delete a flow. Delete one yourself from the workspace's flow list (see Flows).
Changing a live flow. A live version cannot be edited. Asked to change one, the AI stops the
flow, changes it and makes it live again, and until then a call to the flow fails with error
28053 (the flow is not live). To change a flow your systems depend on, clone its live version first with Clone in
the flow editor's toolbar, then ask the AI to change the flow: it works on the newest version, the
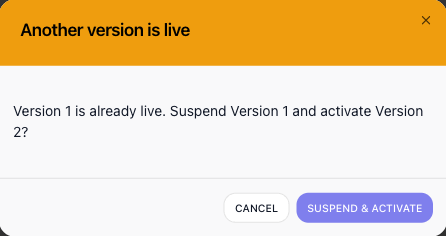
copy, while the live version keeps answering. When the copy is ready, click Start flow on it
in the editor and choose SUSPEND & ACTIVATE to swap it in. See
Running Flows.
Disconnect your AI tool
To disconnect, remove FlowRunner in your AI tool:
- Claude Code: run
claude mcp remove flowrunner. - Codex: run
codex mcp remove flowrunner. - Claude, ChatGPT and Cursor: remove FlowRunner on the screen where you added it.
FlowRunner itself keeps no list of connected AI tools, so there is nothing to remove on the FlowRunner side.