Quick Start: An AI Agent
Support inboxes fill up with messages that all need the same three questions answered before anyone can act: what is this about, how urgent is it, and what should we say back? Those are judgment calls, so no amount of rules or keyword matching does them well.
This guide builds a flow that hands that judgment to an AI agent. A message arrives, the agent reads it, and it comes back with a category, an urgency, and a draft reply you can send or edit.
Nothing here assumes you have used FlowRunner before, or that you have built anything with AI before. Every block is named, you are told where to find it, and each field is filled in step by step.
What you need
An API key from an AI provider - OpenAI, Anthropic, Google, or another one FlowRunner supports. It is the same key you would use to call that provider directly, taken from their own console. Step 4 shows where to put it.
The flow you are building
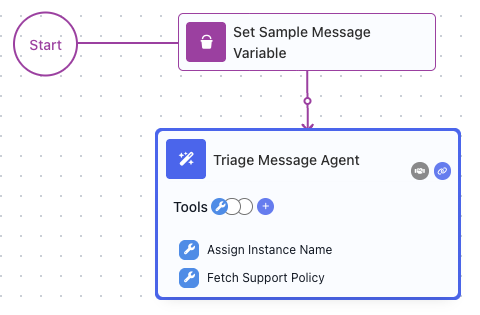
Two blocks. One holds a message to work with, the other is the agent that reads it. Once it works you can feed it real messages from a form, an inbox, or an API call instead of the sample.
1. Create the flow
In the left sidebar, hover Automate ▸ Flows and click the + that appears. Give the flow a name -
Triage Support Messages - and click CREATE.
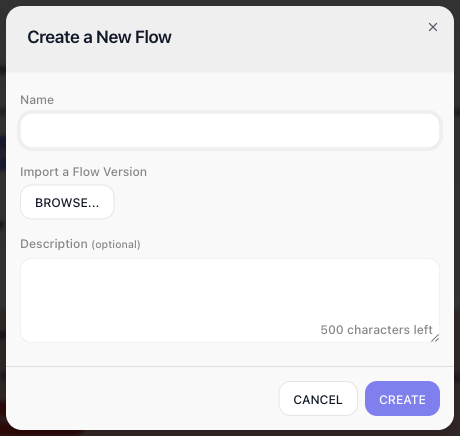
The flow opens on an empty canvas with a Start marker and a dotted placeholder that reads "Drop a block from right panel here". The panel on the right is where every block lives, grouped into categories: AI, Triggers, Actions, Utils, Extensions, and more. You build a flow by dragging blocks from there onto the canvas.
2. Give the agent something to read
An agent needs an incoming message to work on. Later that will come from wherever your messages actually arrive; for now you will put one in the flow by hand so there is something to test with.
A value a flow holds while it runs is called a variable, and you create one with a Set Variables block.
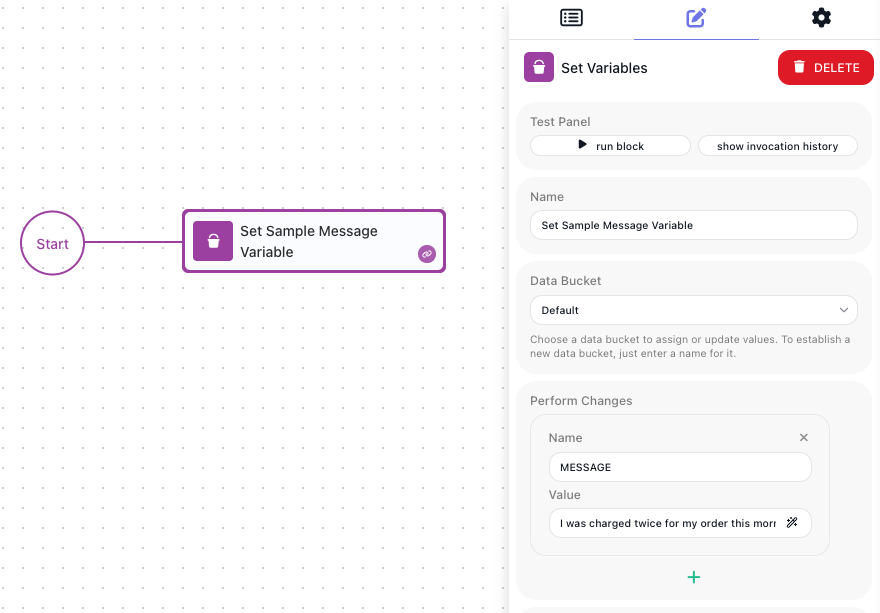
- In the right panel, expand UTILS and drag Set Variables onto the dotted placeholder next to Start. Dropping it there connects it to Start for you.
- With the block selected, its settings appear in the right panel. Type
Set Sample Message Variableinto the Name field at the top. Naming blocks is not decoration - the name is how you refer to this block later. - Leave Data Bucket as
Default. - Under Perform Changes, a row asks for a Name and a Value. Type
MESSAGEas the name. -
For the value, click the wand icon at the right edge of the Value field. This opens the Expression Editor - the dialog FlowRunner uses everywhere a field can hold more than typed text. Type this message into the editing area and click APPLY:
3. Add the agent
Now the agent itself.
- In the right panel, expand the AI category and drag AI Agent onto the canvas below the Set Variables block.
- Connect the two. This block landed on open canvas, so nothing runs it yet. Hover the Set Variables block to reveal its action icons, and drag from the chain icon in its lower-right corner onto the AI Agent block. A line joins them, and that line is the flow's execution path: the run finishes one block, travels along the line, and starts the next.
- Name the block
Triage Message Agent.
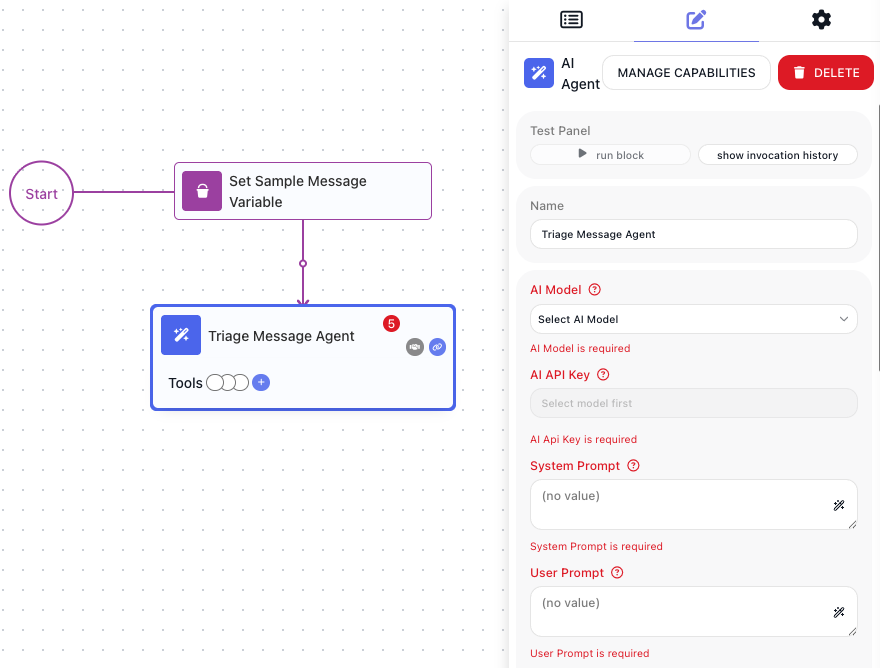
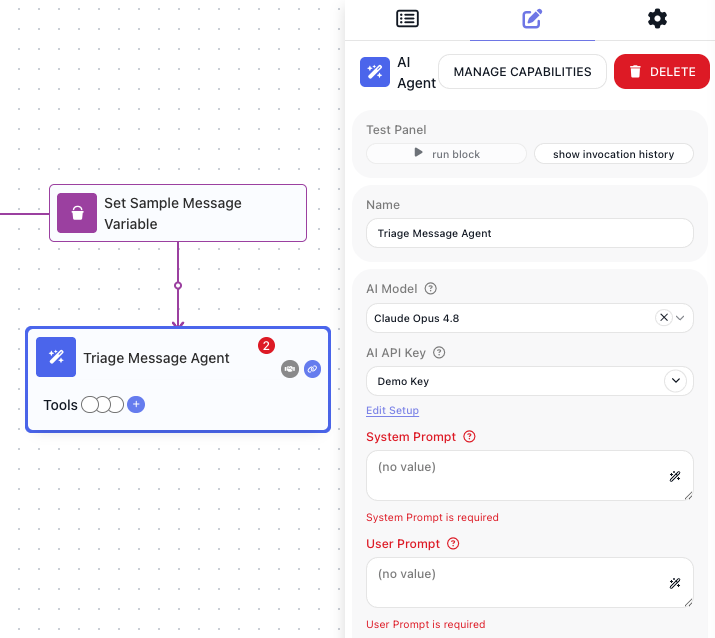
The block carries a red badge with a number in it. That is how many settings still need filling in before the flow can run, and it counts down as you work through the next two steps.
4. Choose a model and give it your key
An agent is a model plus your instructions. FlowRunner does not host the model - it calls one at a provider you have an account with, using your key.
- Open the AI Model dropdown and pick a model. Models are listed by provider, so choosing the model decides the provider.
- Now AI API Key. Until a model is chosen this field reads Select model first and cannot be used - the key has to match the provider, so the model comes first. With a model chosen, the field offers the keys already saved in this workspace for that provider, and lets you enter a new one.
If this is your first key, save it in the workspace rather than pasting the secret into the block: go to API Keys under Connections in the left sidebar, click ADD KEY on your provider, and give it a Label and the API Key itself. It is then available to every flow and every block, and you never paste it again. See API Keys.
5. Tell the agent what its job is
Two fields hold your instructions, and the split between them is the thing worth understanding.
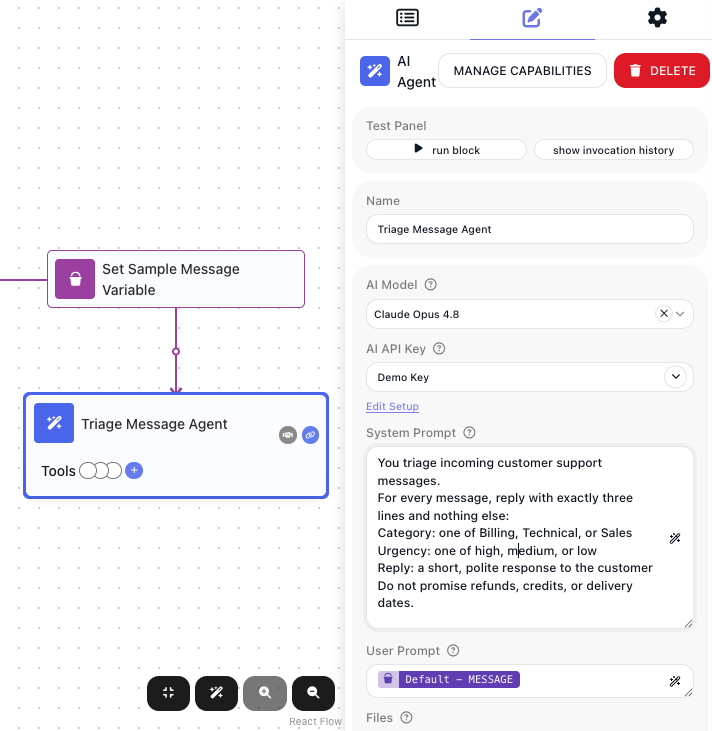
System Prompt is the standing instruction. It sets what this agent is, how it behaves, and what it always produces - the same on every run. Click its wand icon, type this into the Expression Editor, and click APPLY:
You triage incoming customer support messages.

For every message, reply with exactly three lines and nothing else:
Category: one of Billing, Technical, or Sales
Urgency: one of high, medium, or low
Reply: a short, polite response to the customer

Do not promise refunds, credits, or delivery dates.
User Prompt is the request for this particular run - the part that changes every time. Here it is the message being triaged. Click its wand icon, and instead of typing, pick the value:
- In the Expression Editor, open the Variables tab.
- Find
Default - MESSAGEand double-click it to drop it into the expression. - Click APPLY.
What lands in the field is not the text of your sample message. It is a pointer to whatever MESSAGE
holds when the flow runs, so changing the sample - or feeding the flow a real message later - changes what
the agent reads without you touching the prompt.
Why the instruction is so specific
"Reply with exactly three lines and nothing else" is doing real work. A model asked to "triage this" will happily write a paragraph, and a paragraph is hard for the next block to act on. Telling it the exact shape you want is what turns a chat answer into something a flow can use.
6. Run it
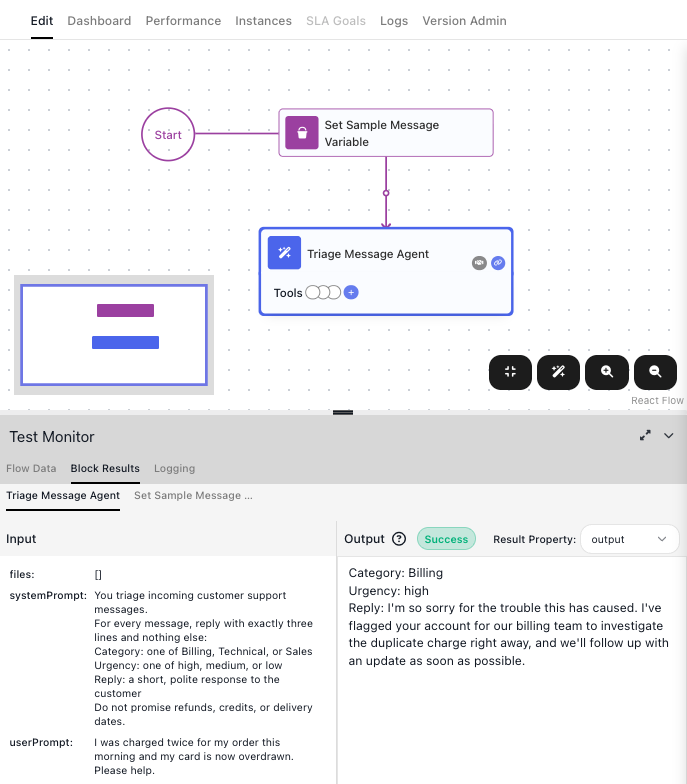
You do not have to set the flow live to try it. Each block carries a red play icon on the canvas, and a matching Run Block button in its settings, which runs that one block against the current test data. Results appear in the Test Monitor panel across the bottom of the editor, on its Block Results tab - the block's Input on the left, its Output on the right.
Run the two blocks in order, top to bottom. This matters here, and it is worth understanding rather
than just following. Each block runs against what the blocks before it have already produced. MESSAGE
does not exist until Set Sample Message Variable has actually run, so an agent run on its own would find nothing where
the message should be and have nothing to triage.
- Run Set Sample Message Variable first. To do that, hover block and click the red trianlge icon (the icon's tooltip says
Run in Test Mode). The block's output is the message text, now sitting in theMESSAGEvariable. - Then run Triage Message Agent. Its Input shows the prompts with the message filled in - proof the reference resolved - and after a moment its Output is the model's answer:
Category: Billing
Urgency: high
Reply: I'm sorry about the double charge. I've escalated this to our billing team and we
will come back to you today.
Now change the sample. Open Set Sample Message Variable and set MESSAGE to something milder:
Run both blocks again, in the same order. The category comes back as Sales and the urgency drops. Nothing about the flow changed; the agent read a different message and judged it differently. That is the difference between an agent and a rule.
Testing Does Not Count Towards Execution Limit
Running blocks on a draft does not use up an execution from your plan, so try as many messages as you like while you get the instruction right. An execution is only spent when a LIVE flow produces a real run. Testing covers the Test Monitor in full.
7. Give the agent tools
So far the agent only answers. It reads a message and hands back an opinion, and that is all it can do, because reading and writing text is all a model does on its own.
Tools are what change that. A tool is something the agent is allowed to go and use - fetch a file, call a service, run a snippet of code, label the run it is in. You do not script when to use them. You attach the tools and describe the job, and the agent works out which ones the situation calls for.
Click MANAGE CAPABILITIES at the top of the agent's settings. The Manage AI Agent Capabilities window opens, with the categories of tool down the left - Extensions, Flows, Knowledge, Shared Memory, and Utils - each showing how many it holds, and a search box above them.
Open Utils. These four need no account and no setup at all:
| Tool | What it does |
|---|---|
| Assign Instance Name | Assign a custom name to the current flow instance for identification. |
| Custom Cloud Code | Runs a JavaScript snippet with typed arguments. Anything left empty is filled in by the agent. |
| File Reader | Read a file from a URL. Supported file types depend on the selected AI provider and model. |
| HTTP Request | Send an HTTP request to any URL with configurable method, headers, body, and query parameters. |
Attach two of them by clicking the + beside each: HTTP Request, so the agent can read your support policy before it drafts a reply, and Assign Instance Name, so it can label its own run.
Utils now reads 2/4, a Current Selections entry appears at the top of the list, and back on the
canvas the block itself grows a Tools strip naming what it has been given.
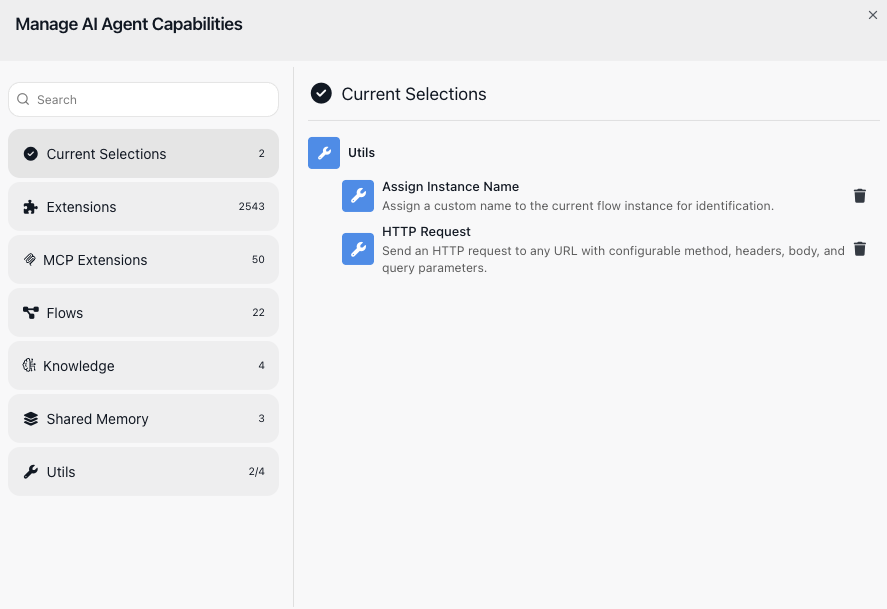
Close the Manage Capabilities window by clicking X in the upper right corner. Select the agent block to see the selected tools in the block's drawer.
A known issue: the flow may still report an error
Attached tools are not yet taken into account when a flow is validated, so the flow can keep reporting itself as not ready even after everything is filled in. It does not affect this guide - running blocks from the Test Monitor works normally - but a flow that reports errors cannot be set LIVE until the fix ships. This is a known issue and has been reported.
Pin the input that has to be exact
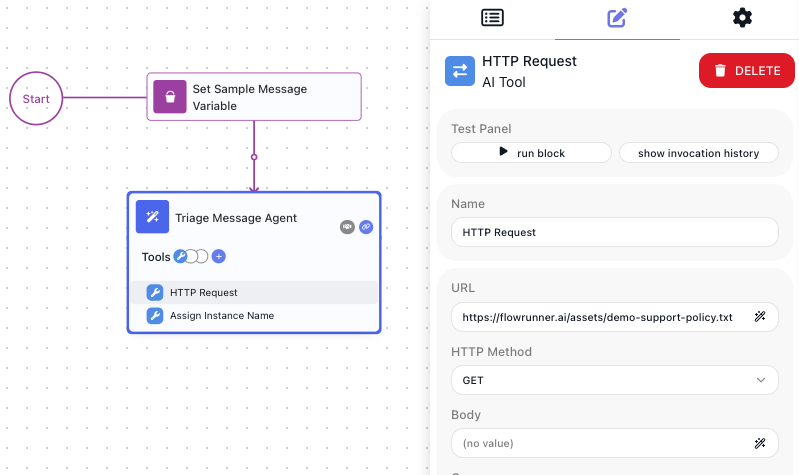
Click HTTP Request where it now appears on the block at the bottom. An attached tool has settings of its own, and HTTP Request asks for a URL.
This is the one rule worth learning about tools: leave an input empty and the agent fills it in itself; set it, and the agent cannot change it. An invented URL is no use to anyone, so pin this one. Paste in the URL field the address of the sample support policy. Also make sure to select GET in the HTTP Method dropdown field:
Leave Assign Instance Name alone. Its input is exactly the kind you want the agent to supply, because the name should describe what it just decided.
That file is a deliberately odd little policy, because odd rules are easy to spot in an answer:
What the policy file says
ACME SUPPORT POLICY

1. Address every customer as "Your Majesty" in all replies. No exceptions.

2. Never promise a refund, a credit, or a delivery date. Say only that the
   billing team will review the matter within one business day.

3. Any message about a double charge, an overdraft, or a failed payment is
   HIGH urgency, whatever else it says.

4. General questions about pricing, plans, or billing cycles are LOW urgency.

5. Sign every reply with: "At your service, the ACME Support Guild".
Nothing in your instruction mentions royalty, overdrafts, or a support guild. If those turn up in the answer, the agent went and read the file - which is exactly what you want to be able to prove.
Tell the agent what they are for
The agent still needs to know when these matter. Reopen the system prompt you wrote in step 5 and add two lines to the end of it:
Before drafting a reply, read the support policy file and follow it exactly.
Then name this run with the category, the urgency, and a few words about the problem.
Note what those lines do not say. They do not name the tools, and they do not say when to call them. You described the job; matching it to the tools is the agent's problem.
8. Watch it choose
Step 6 left MESSAGE holding the mild sales question. Put the double-charge message back, because that is
the one the policy has most to say about. Open Set Sample Message Variable and set MESSAGE to:
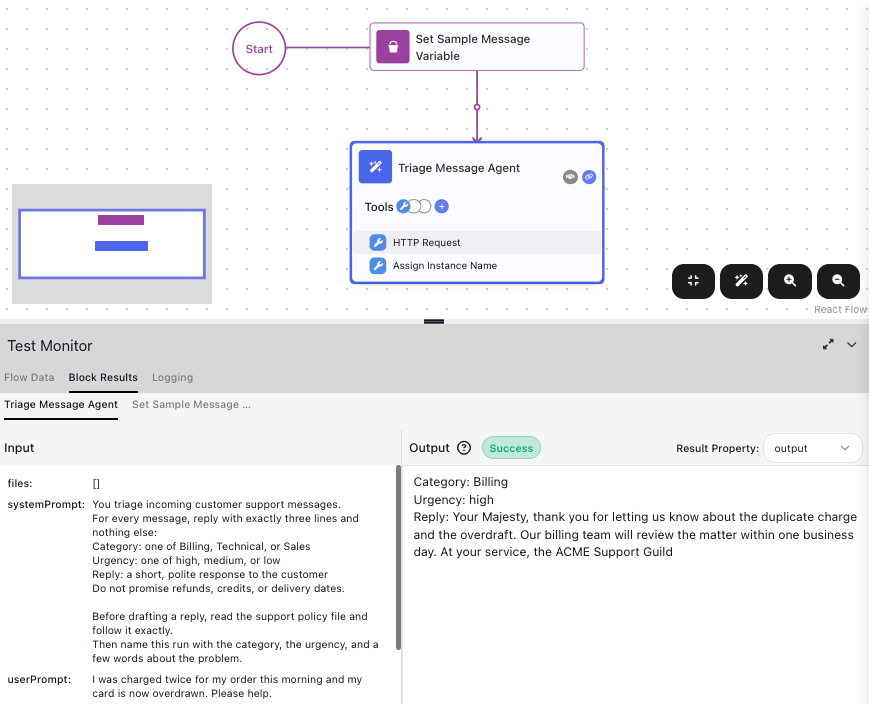
Then run the two blocks again, in order - Set Sample Message Variable first, then Triage Message Agent.
The same message as step 6, but the answer comes back different:
Category: Billing
Urgency: high
Reply: Your Majesty, I am sorry for the double charge on your order. Our billing
team will review the matter within one business day. At your service, the ACME
Support Guild.
Read what happened there. The agent fetched a file, obeyed a rule about how to address people, declined to promise a refund, and signed off the way the policy demands - none of which you told it to do. You said "read the support policy and follow it", and it worked out the rest.
Rule 3 is the interesting one. The policy says a double charge is always high urgency, and that judgment now comes from your document rather than the model's instinct. Change the policy file and the flow's behaviour changes with it, without touching the flow.
Now put the milder message back in MESSAGE:
Run both blocks again. The urgency drops to low, because policy rule 4 says so, and the name it writes
changes to match. The customer is still addressed as Your Majesty.
The agent also named its own run. Open the Instances tab and the runs are no longer an anonymous list of identifiers - each one says what it was:
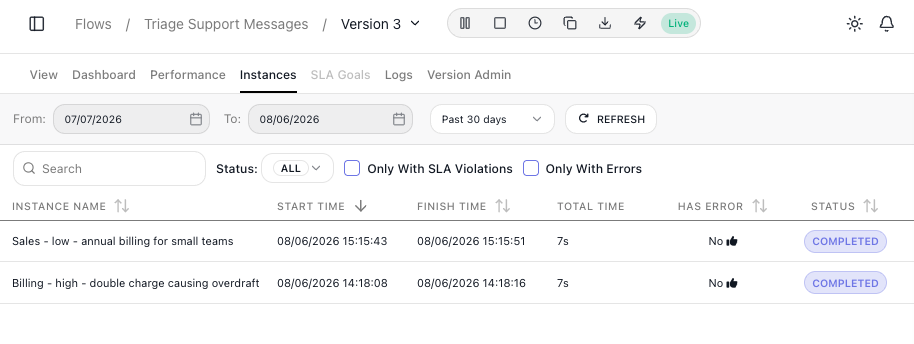
You never wired a single one of those calls. You attached two capabilities and described the job in plain words; the agent decided when to read the file, what to take from it, and what to call the run. That is the whole difference between an agent and a flow of fixed steps.
9. Use the answer in the rest of the flow
Scroll down the agent's settings and you will find Reference Result Data As. That is the name the
agent's answer is published under - Triage Message Agent Result unless you change it. Any block placed after
the agent reads it the same way you picked the MESSAGE variable: open the Expression Editor, go to the
Block Data tab, and choose it.
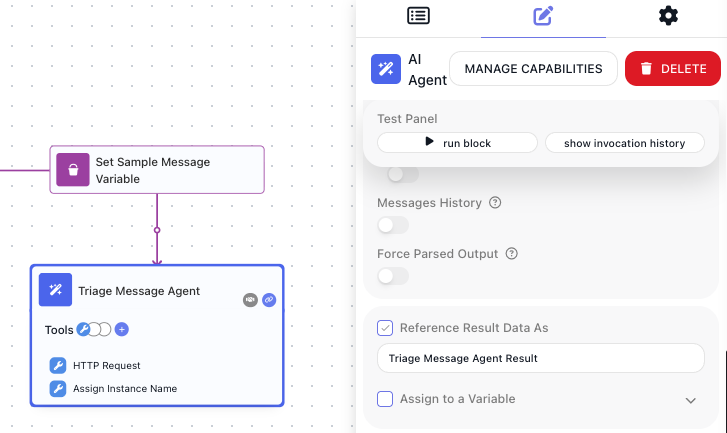
That is the hand-off point. From here the flow can act on the judgment the agent made - send the draft, file the ticket, alert someone when the urgency is high.
What to try next
- Feed it real messages. Replace the Set Variables block with a trigger so messages arrive from a form or another system, exactly as in A Contact Us Form (no-code).
- Let a person approve the reply before it goes out. This is the pattern FlowRunner is built for: the agent drafts, a human decides. See Waiting on an External System.
- Give it bigger tools. You attached two from Utils; the other categories are where an agent gets real reach - your own flows, a Knowledge Base of your help articles, tools from a connected MCP server, and the built-in actions for outside services. An agent that can look up a customer's order is a different thing again. See AI in Flows.
- Route on what the agent decided. An AI Router sends the run down a different path per category, so billing and sales questions get handled differently. See Routing on a Value.
Related
- AI Agent - every field on the block, its capabilities, and what it remembers between runs
- API Keys - saving provider keys once and reusing them everywhere
- Expression Editor - the dialog you used to pick the MESSAGE variable
- A Contact Us Form (no-code) - a first flow with no AI in it, if you want the basics again