Testing
Much of what a flow does happens out of sight - it calls a service, reshapes a payload, runs a rule, and moves on. Testing is how you confirm a flow does what you intended before you rely on it. You run it against sample data and check, block by block, that each step received the right input and produced the right result. When a step is wrong, testing points you straight at which block failed and why, so you can fix it before a live run hits it.
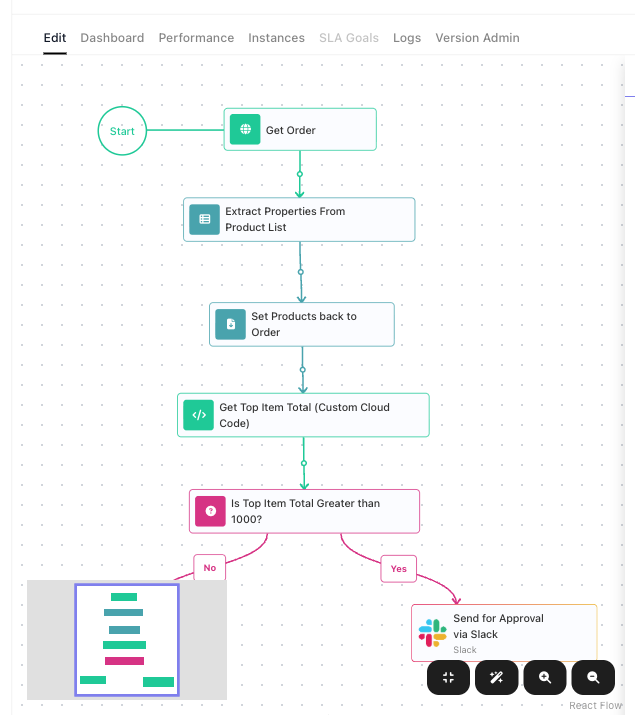
This page follows one example flow that reviews an incoming order. It fetches the order from a partner's API, trims it down, reattaches the tidied lines, finds the most expensive item, and decides whether a manager needs to approve it - several different kinds of block, wired together. A small payment flow then shows how to test an External Callback, which waits for a call from outside.
The Test Monitor
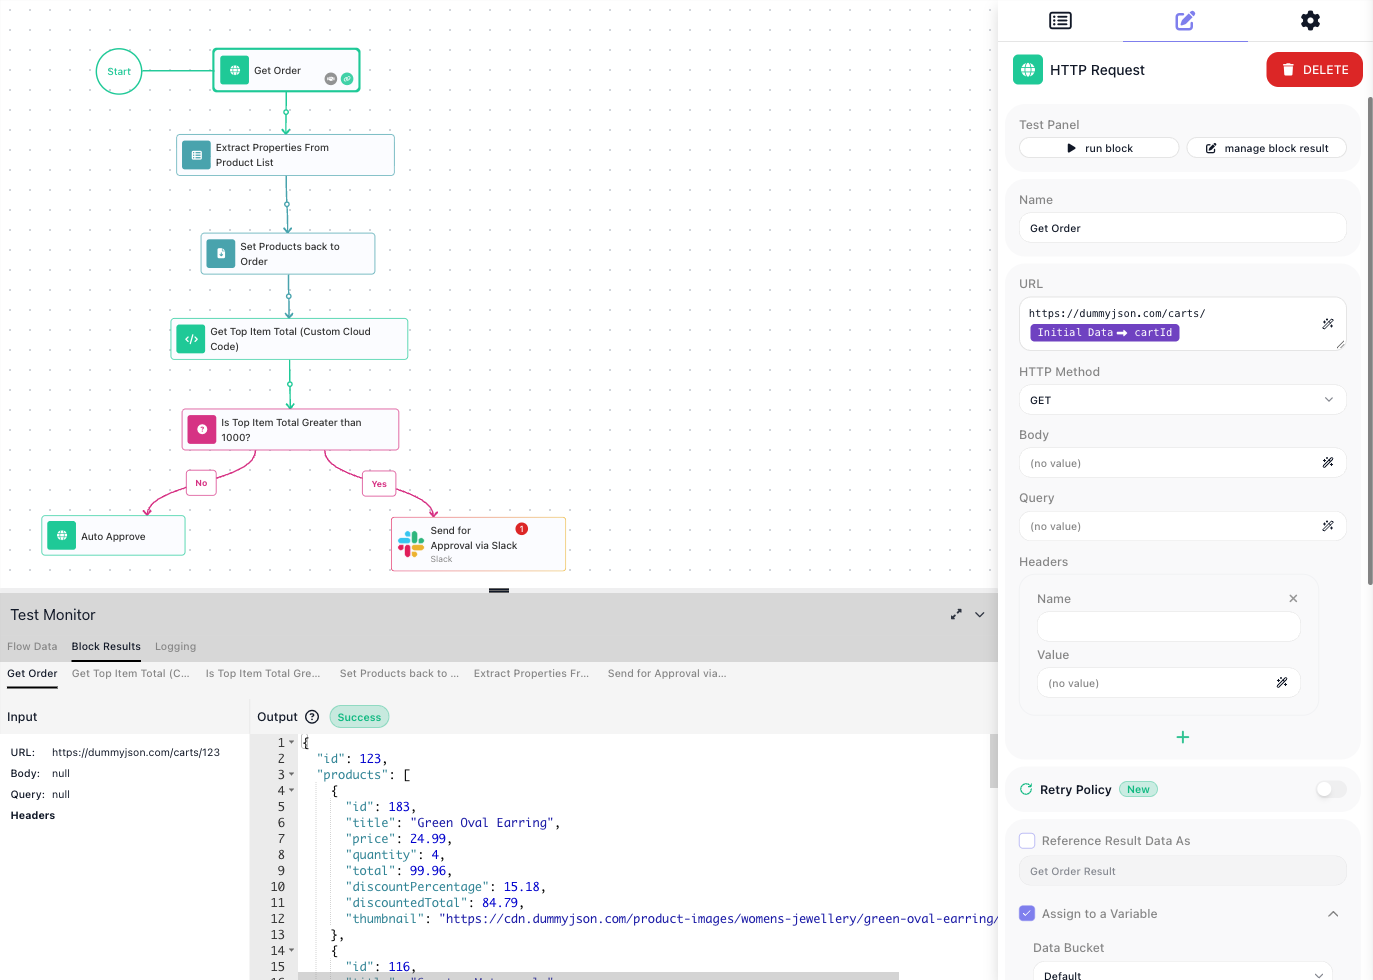
You test a flow in the Flow Editor: you run blocks right on the canvas. The Test Monitor panel across the bottom is where you enter the flow's test data and read the results. It has three tabs:
- Flow Data - the sample input you give the flow to stand in for the data it would receive for real.
- Block Results - what each block took in and gave back. Pick the block's tab to see its result.
- Logging - each block starting and finishing, and any error it hit.
You test on a draft version. A version that is LIVE opens on the View tab: its blocks have no run icons and there is no Test Monitor. Its toolbar's Run Instance starts a real instance, which counts as an execution. To test a LIVE flow step by step, clone the version and test the copy - see Change a flow that is already live.

Give the flow its test data
In a real run, the call that starts an instance of this flow sends the id of the cart to fetch as its Initial Data. In a test nothing sends it, so you provide it yourself on the Flow Data tab: add a row, name it, and give it a value. The example needs a cartId.
A value that looks like a number, true/false or JSON has an A icon beside it, here and in the other test dialogs on this page. Green means the value is kept as text; dark means it is kept as the number, boolean or JSON you typed. Click the icon to switch, and match what the flow will receive for real.
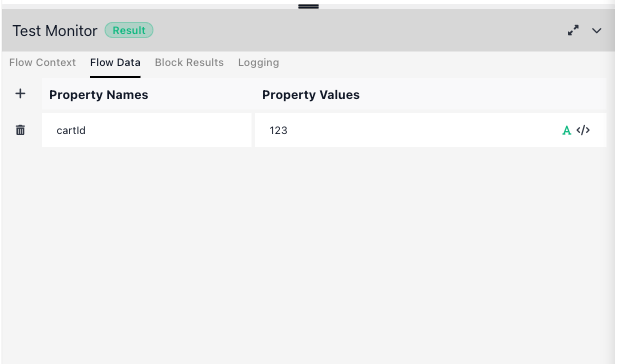
From here on, any block that reads Initial Data → cartId sees 123 when you test it.
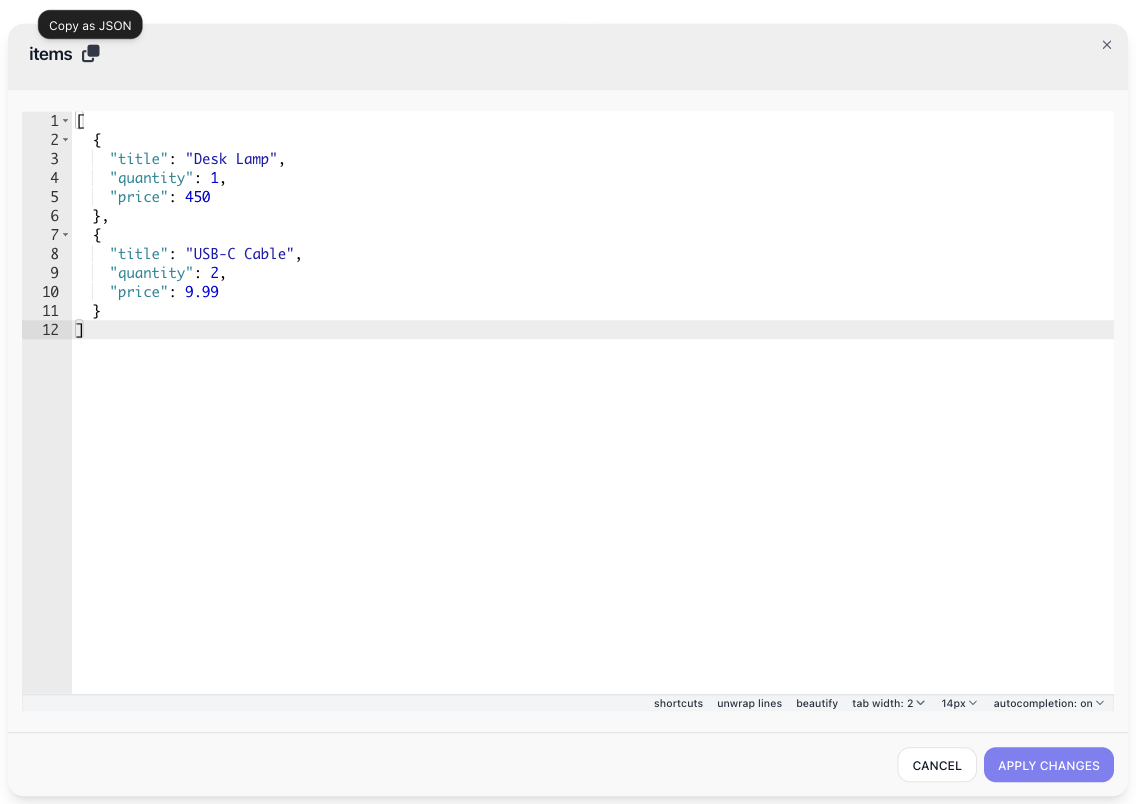
Objects and lists. When the flow receives an object or a list - an order's items, say - edit the value as
JSON: click the JSON Editor icon at the right of its cell, change the value in the dialog, and click
APPLY CHANGES. The dialog shows the value formatted, so a long list is easy to read and check, and the
Copy as JSON icon beside the property name copies the whole value, formatted, to paste elsewhere. If an edit
leaves the JSON invalid, the value is saved as plain text and its A icon disappears: a block that expects a
list then gets a string. In the table, a long value is cut off with …; click into the cell to see all of it.
Run a block and read its result
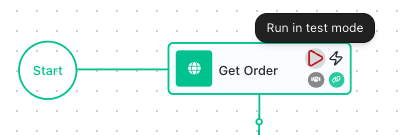
Hover a block on the canvas to reveal a red play icon (tooltip: Run in test mode); the Test Panel at the top of the block's settings carries a matching run block button. Either one runs that single block against the current test data. The run is real: an action block performs its action, so Get Order really calls the partner's API.
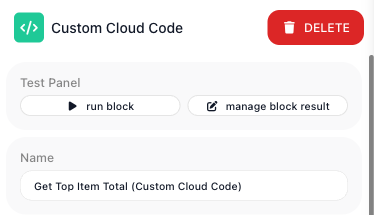
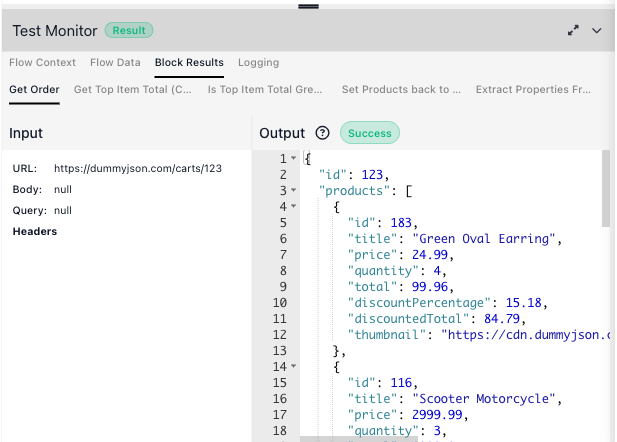
A run shows its outcome on the Block Results tab: the block's Input - the values it resolved - on the left, and its Output - what it produced - on the right. Run each block after the blocks that feed it, because a block reads the results they produced.
Fetching the order. Get Order is an HTTP Request block. It calls the partner's cart address, https://dummyjson.com/carts/ followed by Initial Data → cartId, and its Output is the whole order the API returned - a nested object with a products array and the order totals.
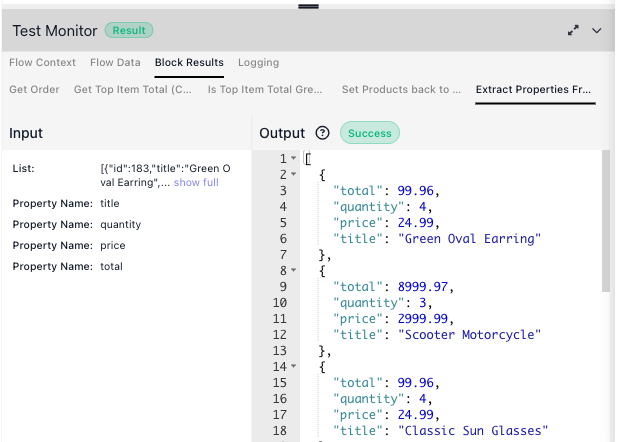
Trimming it down. Extract Properties From Product List is a Transform Data block that keeps the few fields that matter. Its Input is the order's product list and the four property names to keep; its Output is a clean list of { title, quantity, price, total }.
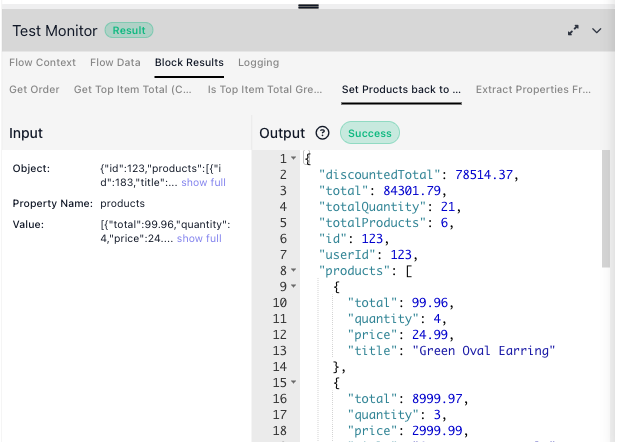
Putting it back together. That trim returns only the array of lines, without the order around it. Set Products back to Order is a second Transform Data step that writes the array onto the order's products property, so the order keeps its totals and carries the tidy line list forward. You can see it in the result: the Input is the order plus the trimmed array, and the Output is the order again, its products now the four-field lines.
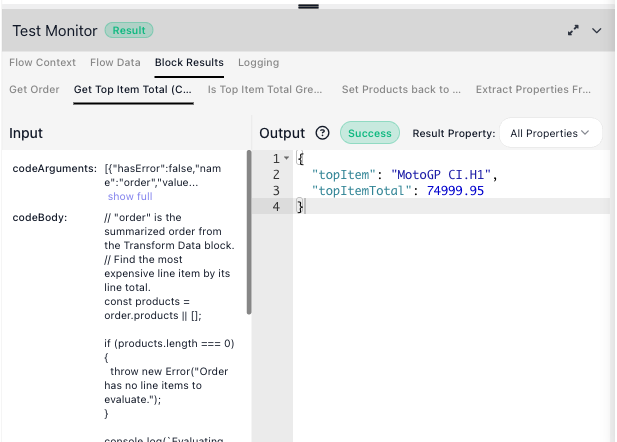
Computing over it. Get Top Item Total, a Custom Cloud Code block, loops those lines to find the most expensive one. Its Input shows the arguments passed in and the code itself; its Output is what the code returned - { topItem, topItemTotal }.
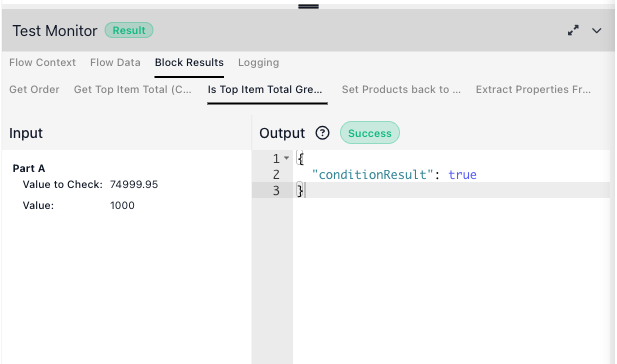
Deciding. The Condition block, named Is Top Item Total Greater than 1000?, compares the most expensive item's total against a threshold. Its Input shows the two values - 74999.95 against 1000 - and its Output is the branch it takes, conditionResult: true.
Change the cartId on the Flow Data tab and run the blocks again to send a different order through.
Edit an Output to test a case
The Output of each result on the Block Results tab is editable. Change a value there, and a later block that reads this block's result gets your version the next time you run it. That is how you test a case your sample data does not cover, without touching the flow or the data source.
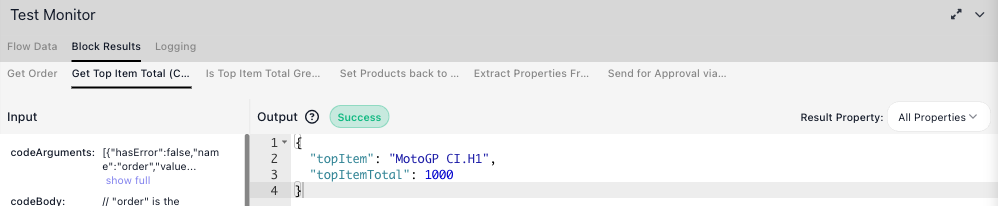
For example, what happens to an order whose priciest line comes to exactly 1000? Open Get Top Item Total's
result and change topItemTotal to 1000:
Run the Condition. It compares 1000 against 1000, which is not greater, so it takes the No branch:
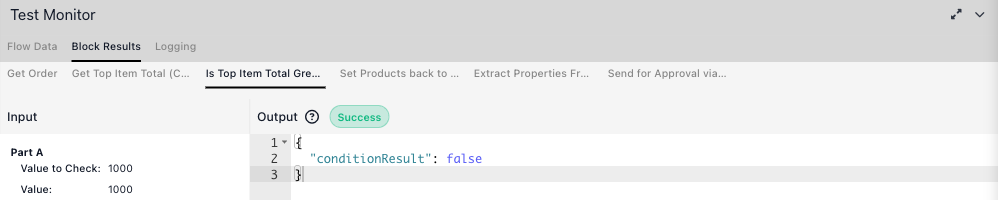
The edit is saved as you make it and is still there after a page reload, until the block runs again. It reaches only blocks that read this block's result; a block that reads the same data from somewhere else, such as a variable, does not see the edit.
Set a block's result without running it
Editing an Output needs a result to edit, so the block has to run first. Some blocks you cannot or should not run in a test:
- a block that would send a real message or change real data
- a block that needs a connection you have not set up yet - its run block stays disabled
- a block whose earlier steps you have not built yet, or do not want to run again
manage block result, next to run block in the block's Test Panel, lets you type the result in instead.
In the example, the sample cart's priciest item is far above 1000, so the Condition always takes the Yes branch. To test the No branch, give Get Top Item Total a result by hand - a Desk Lamp at 450 - and run the Condition on its own. Nothing before it has to run, so Get Order never calls the partner's API:
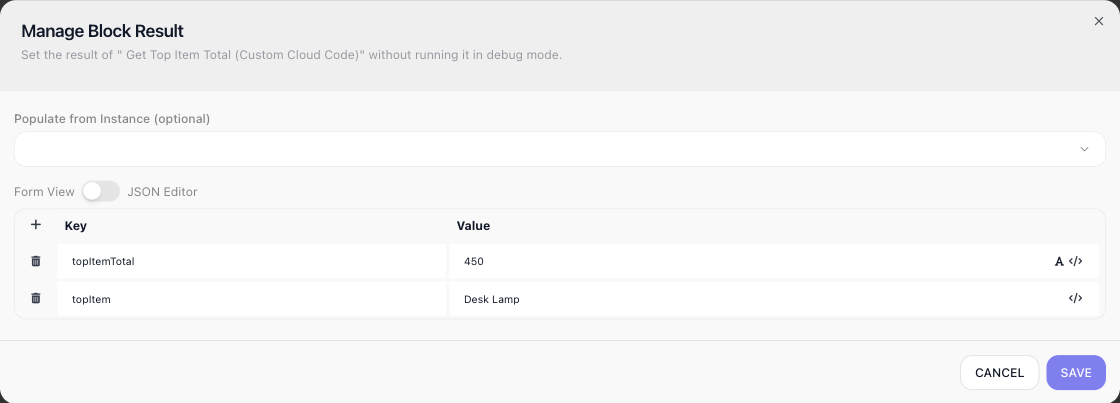
- Add a row per property with the +. Turn the Form View / JSON Editor switch to JSON Editor to type or paste the whole value as JSON; while the JSON is not valid, SAVE stays disabled and the dialog reads Enter valid JSON to save.
- Type
450, then click the A beside it so it turns dark: the Condition compares numbers against 1000. - The Populate from Instance selector (optional) fills the dialog from a real run of this version, which you can then edit. It lists runs from when a version was LIVE, so on a draft that has never been LIVE it stays empty, as it is here. For a block inside a loop, an Iteration picker chooses which pass to copy.
- For a block whose result is a list, such as Extract Properties From Product List, Form View shows one Item row per entry: + adds an entry and the bin removes one.
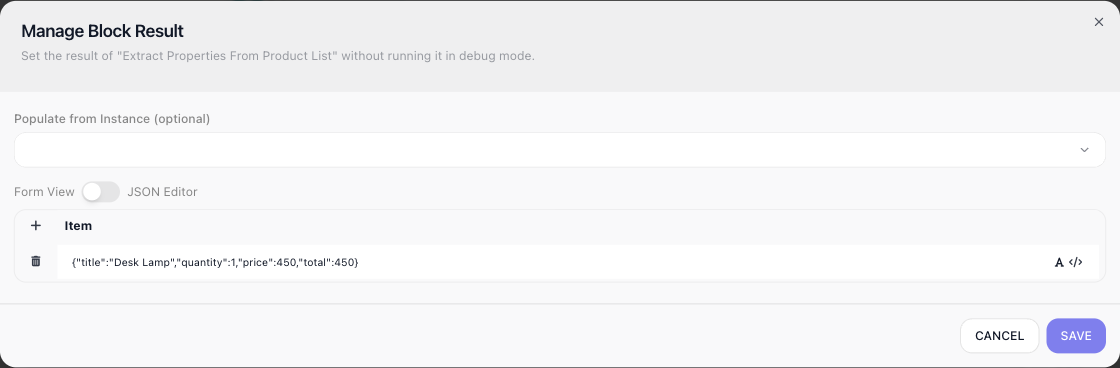
SAVE records the value as the block's result, and every later block reads it as if the block had
produced it. Run the Condition and it reads 450 against 1000 and returns conditionResult: false - the
No branch:
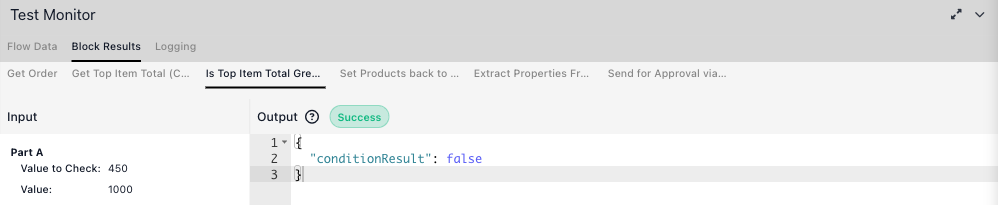
The saved result also gives the Expression Editor the block's fields to pick from, so you can wire later blocks to a block that has never run:
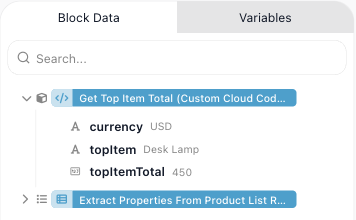
The value stays after a page reload, and Block Results always shows it as the block's Output. It is replaced when you save a new one, or when the block runs again. It is test data only - a real run of the flow still runs the block.
Run an instance from a block
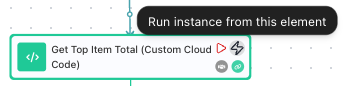
Running a block tests one step. To run the rest of the flow from a chosen point - no stopping between blocks - use Run instance from this element, the lightning icon beside a block's play icon. The run starts at that block; the blocks before it do not run.
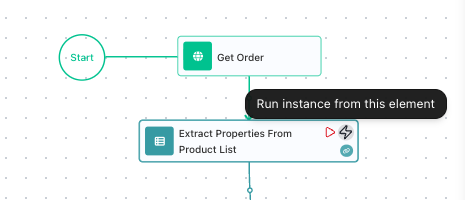
It opens the Launch Flow Instance dialog. The dialog lists the Initial Data the flow reads and, for a block
partway down the flow, the results of earlier blocks that the block reads, filled in from Block Results.
Launched from the Condition, it offers Get Top Item Total's topItemTotal, here set to 2000:
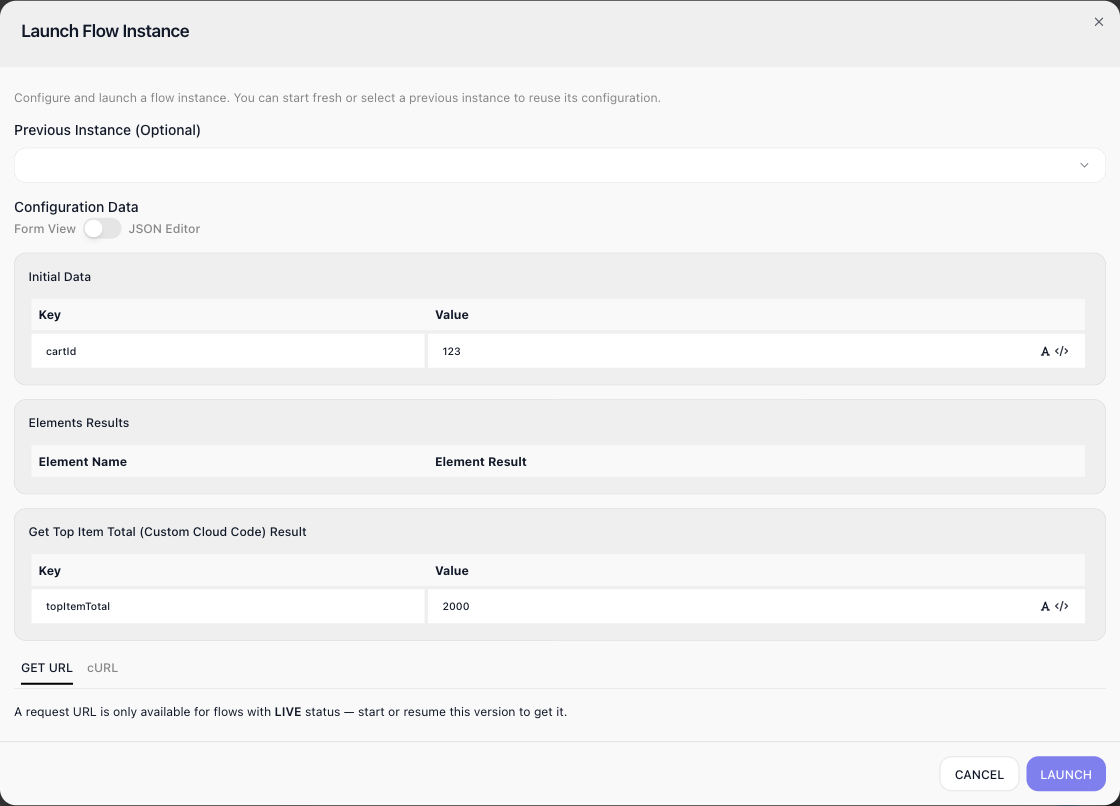
Change any value, or pick a previous instance in the Previous Instance selector to reuse the data from an earlier run - including a real instance from when a version was LIVE, which is a quick way to reproduce a case that actually happened. The selector lists this version's runs, newest first. Each one shows its instance name, if an Assign Instance Name block gave it one, and its start time, with the execution ID underneath. Type part of a name into Search by instance name to find a run, for example the order it handled. The line under the list says how many runs it shows, such as Showing last 1 of 1 instance(s) of this version. Runs older than the log history of your workspace billing plan are not listed. LAUNCH starts the run. Its results appear on the Block Results and Logging tabs, and the canvas marks each block that ran.
A value you type into one of these rows is sent as the type it looks like: 123 arrives as a number, and the
A beside it stays dark. The JSON Editor view shows exactly what will be sent.
Once this version is LIVE, the dialog also offers a GET URL and a cURL command that start an instance over HTTP. Every instance you start with LAUNCH counts as one execution, on a draft version as well as on a LIVE one - see What testing costs.
Find the block that failed
When a block cannot do its job, its Output on the Block Results tab shows an Error badge and the message.
Give the example a cart that does not exist - cartId 99999 on the Flow Data tab - and run Get Order:
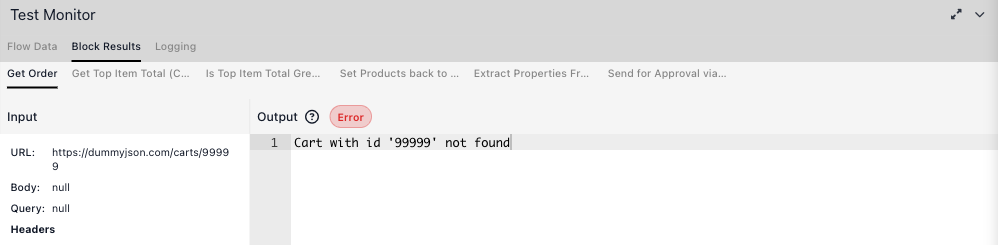
The Logging tab shows each block starting and finishing. For the block that failed it adds the error and the line Block has no error handler. Execution will be terminated. - in a real run, that error stops the run unless a Handle Error block catches it - see Handling Errors.
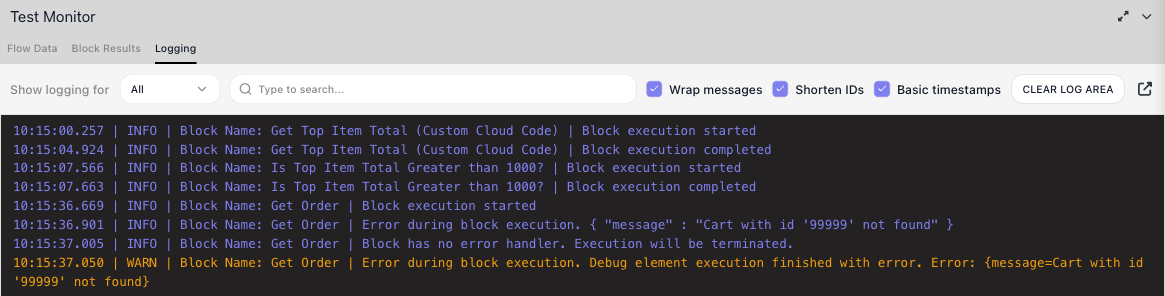
Show logging for narrows the list to one block, the search box finds a line, and CLEAR LOG AREA empties the log before your next test. With Basic timestamps cleared, each line carries the full date and time zone.
Test an External Callback
This section uses a small payment flow whose first step is an External Callback. Running a callback on its own shows you exactly what a caller sends, and gives the next blocks real fields to pick - without the flow being LIVE.
Run the External Callback with its red play icon or run block. It does not finish at once: it waits for a call. While it waits, the icon turns into a spinner and the Test Panel button reads stop block:
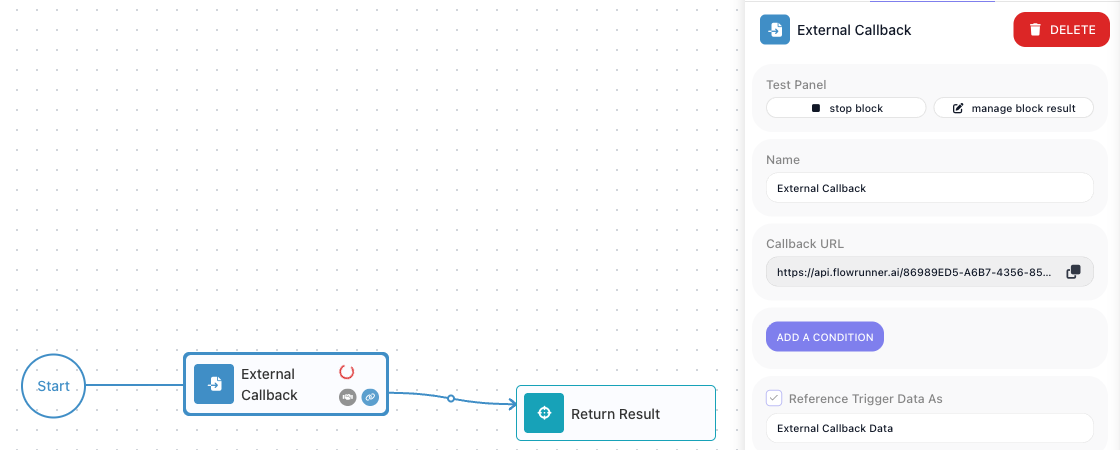
Copy the block's Callback URL. Open a terminal and enter the following command, replacing
<Callback URL> with the URL you copied:
curl --request POST \
  --url "<Callback URL>" \
  --header "Content-Type: application/json" \
  --data '{
    "event": "payment.succeeded",
    "orderId": "ORD-9200",
    "amount": 2500,
    "currency": "USD"
  }'
The call is answered {"executionId": "test"} - a test run has no run id, so it gets this placeholder -
and the request's data becomes the block's Output on the
Block Results tab:
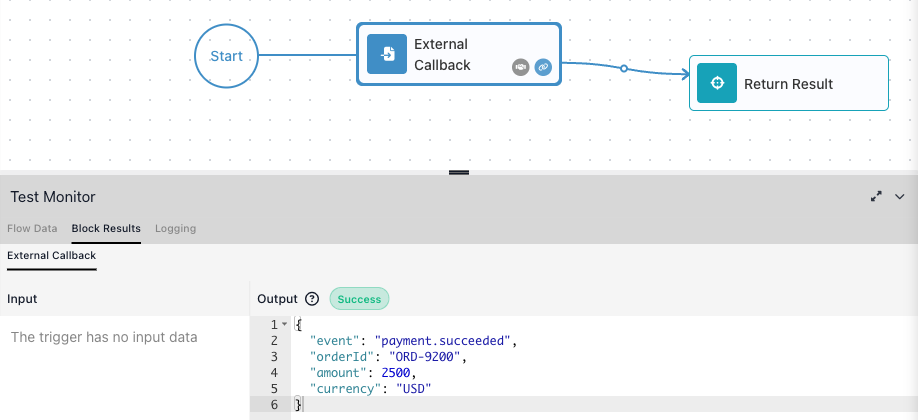
stop block ends the wait without a call; the button goes back to run block, and Block Results keeps whatever the last run produced. Outside a test, the Callback URL answers only while the flow is LIVE. While the block waits in a test run, a call to it reaches the block on the version you are building, and the Expression Editor lists the test call's fields for the blocks after the trigger. If you also captured a sample with Learning Mode, the test call's fields come first, and the learned sample is kept - see Waiting on an External System.
If another version of this flow is LIVE, the call reaches it too: it starts a real run of the LIVE
version, the reply carries that run's id instead of test, and that run counts as an execution.
Run a LIVE callback flow without a caller
To check the LIVE version end to end without waiting for the payment provider, let the launch dialog make the
call for it. On a LIVE version whose first block is an External Callback, Run Instance in the toolbar opens
the Launch Flow Instance dialog with a Trigger the External Callback automatically switch. Turn it on and
fill External Callback Data with what a caller would send, here amount 2500 and orderId ORD-9200.
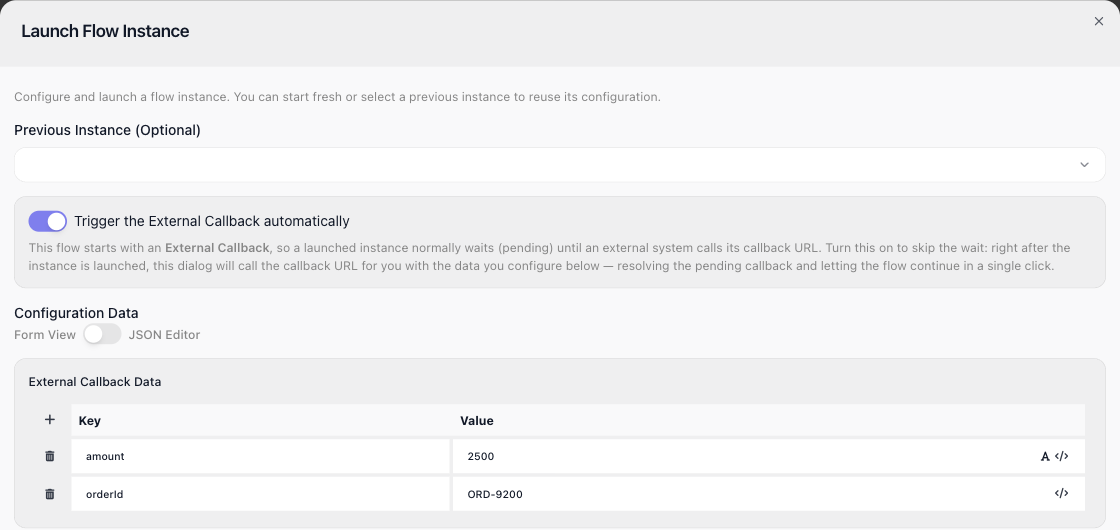
LAUNCH starts an instance and then calls its callback with that data, so the run goes on to the end instead of waiting at the callback. This is a real run of the LIVE version: it does everything that version does and counts as an execution. With the switch off, LAUNCH starts the instance and it waits until something calls the Callback URL. The switch works only when you click LAUNCH: the dialog's GET URL and cURL start the instance and nothing more, so it waits the same way.
What testing costs
Running blocks one at a time is free. run block in the Test Panel, or the play icon on a selected block, does not count against your monthly execution allowance, however often you use it. The exception is a SubFlow block: running it runs the whole subflow, and that counts as one execution.
Launching an instance counts as one execution, the same as a run started any other way. That covers Run Instance in the toolbar, which runs the whole flow, and the lightning icon on a block, which runs the flow from that block, on a draft version as well as on a LIVE one.
A test call to an External Callback that also reaches a LIVE version starts a real run of that version, which counts too. Once the workspace has used its allowance, a launch from the editor is refused with the same Exceeded the limit of ... flow executions per billing period message as any other run, while run block keeps working. See Billing for what does and does not count.
Related
- Billing - what counts as an execution
- Custom Cloud Code - the code block tested above
- Running Flows - taking a flow live and running it for real